
Steal This Social Media Calendar Template (+ How to Make Your Own From Scratch)
Create your own social media calendar with a step-by-step guide, or use this free calendar template to get planning right away.


Content Writer @ Buffer
If you fail to plan, you plan to fail.
As a super Type-A person, that’s a favorite expression of mine. And — having spent many years managing various social media platforms in marketing and media — I’ve learned the hard way that this is one area where you absolutely cannot wing it. Especially if you’re managing multiple channels.
You need a social media content calendar.
A social media calendar is a game changer when building a social media presence, be it as someone building your personal brand, a creator, or a social media manager.
But you’re reading this article, so I’m preaching to the converted — so let’s get right into the meat of it. I’ll walk you through the benefits of having a social media calendar and exactly how to create your own calendar using Buffer. I’ll also share the social media calendar system we use in our Marketing team, along with a plug-and-play social media calendar template you can use right away.
Why you need a social media calendar
We’ve written about why you need a social media calendar in-depth, so I’ll leave you with the essential benefits of having one here. A social media calendar will help you:
- Stay on top of multiple social media channels efficiently
- Stick to the content pillars in your social media marketing strategy
- Post consistently
- Schedule posts in advance and automate processes so you’re not working around the clock
- Work with team members (if you’re on a Marketing team or social media team), collaborators, or stakeholders
- Stay on top of product launches, marketing campaigns, events, or even holidays
- Streamline a system of approvals before posting
- Save time with content batching
- Repurpose content
- Keep track of content ideas
How to create your own social media calendar from scratch
Buffer is a social media scheduling tool built to make it easier to grow your following online. It’s a one-stop-shop for the entire process — from content ideation to publishing, right on to analyzing content performance.
There are a host of other perks to housing your social media calendar right in Buffer — beyond the ability to plan and schedule in a single tool:
- A high-level monthly view for big-picture planning.
- A more in-depth weekly view to see all the key details at a glance.
- The ability to exclude certain channels from view for extra clarity and focus.
- Access it anywhere. Thanks to Buffer’s mobile app, you can check or amend your calendar on the go.
- More to come! The calendar is a big focus for us at the moment, and we have some really exciting plans for 2024.
📲 Download the Buffer app for iOS here
📲 Download the Buffer app for Android here
I’m going to walk you through exactly how to create yours in Buffer’s free social media calendar, take you beyond planning, and right into scheduling.
1. Define your social media strategy
Before you even open a calendar tool, a social media strategy should be your first port of call.
If you’re a creator and not a social media manager, it will be tempting to skip this step. But trust me, content strategy is not just for Marketing teams. They’re a crucial step in social media success. Random posting = random results. Having clear goals, understanding your target audience, and defining your content pillars will make your work much easier and more successful in the long run.
Don’t just take it from me — I love this Reel by @stanforcreators, which outlines just how important it is for creators and their unique approach to creating one.
This doesn’t involve pages and pages — even just a single-page guide will help you get crystal clear on your goals and how you’re going to get there.
You’ll find our complete social media strategy guide here, and it’s well worth working your way through it if you’re just starting (there’s even a template there, too!). Here’s a high-level overview of your steps:
- Pinpoint your ‘why.’ Why do you need to be active on social media? What is your ultimate goal?
- Define your target audience. Who are you trying to reach with your content?
- Define your content pillars. What are you going to share, and why will it resonate?
- Choose your platforms. Which social media sites will you use to reach your audience? How many social platforms should you choose?
- Set your cadence. Decide on your posting frequency (which may differ from platform to platform).
2. Connect your channels
Congratulations, the toughest part is out of the way! With your strategy in hand, you’re ready to connect your social media accounts to Buffer. First, make sure you’re logged in to those channels in the browser or on the device you’re using.
Then log in to Buffer, head over to account.buffer.com/channels, and choose Connect Channel. You could also click on your profile avatar at the top right of your dashboard and click Account, then Channels.
Click on the type of channel you'd like to connect. (If you already have channels connected, click Connect New Channel and then click the channel you'd like to connect.)
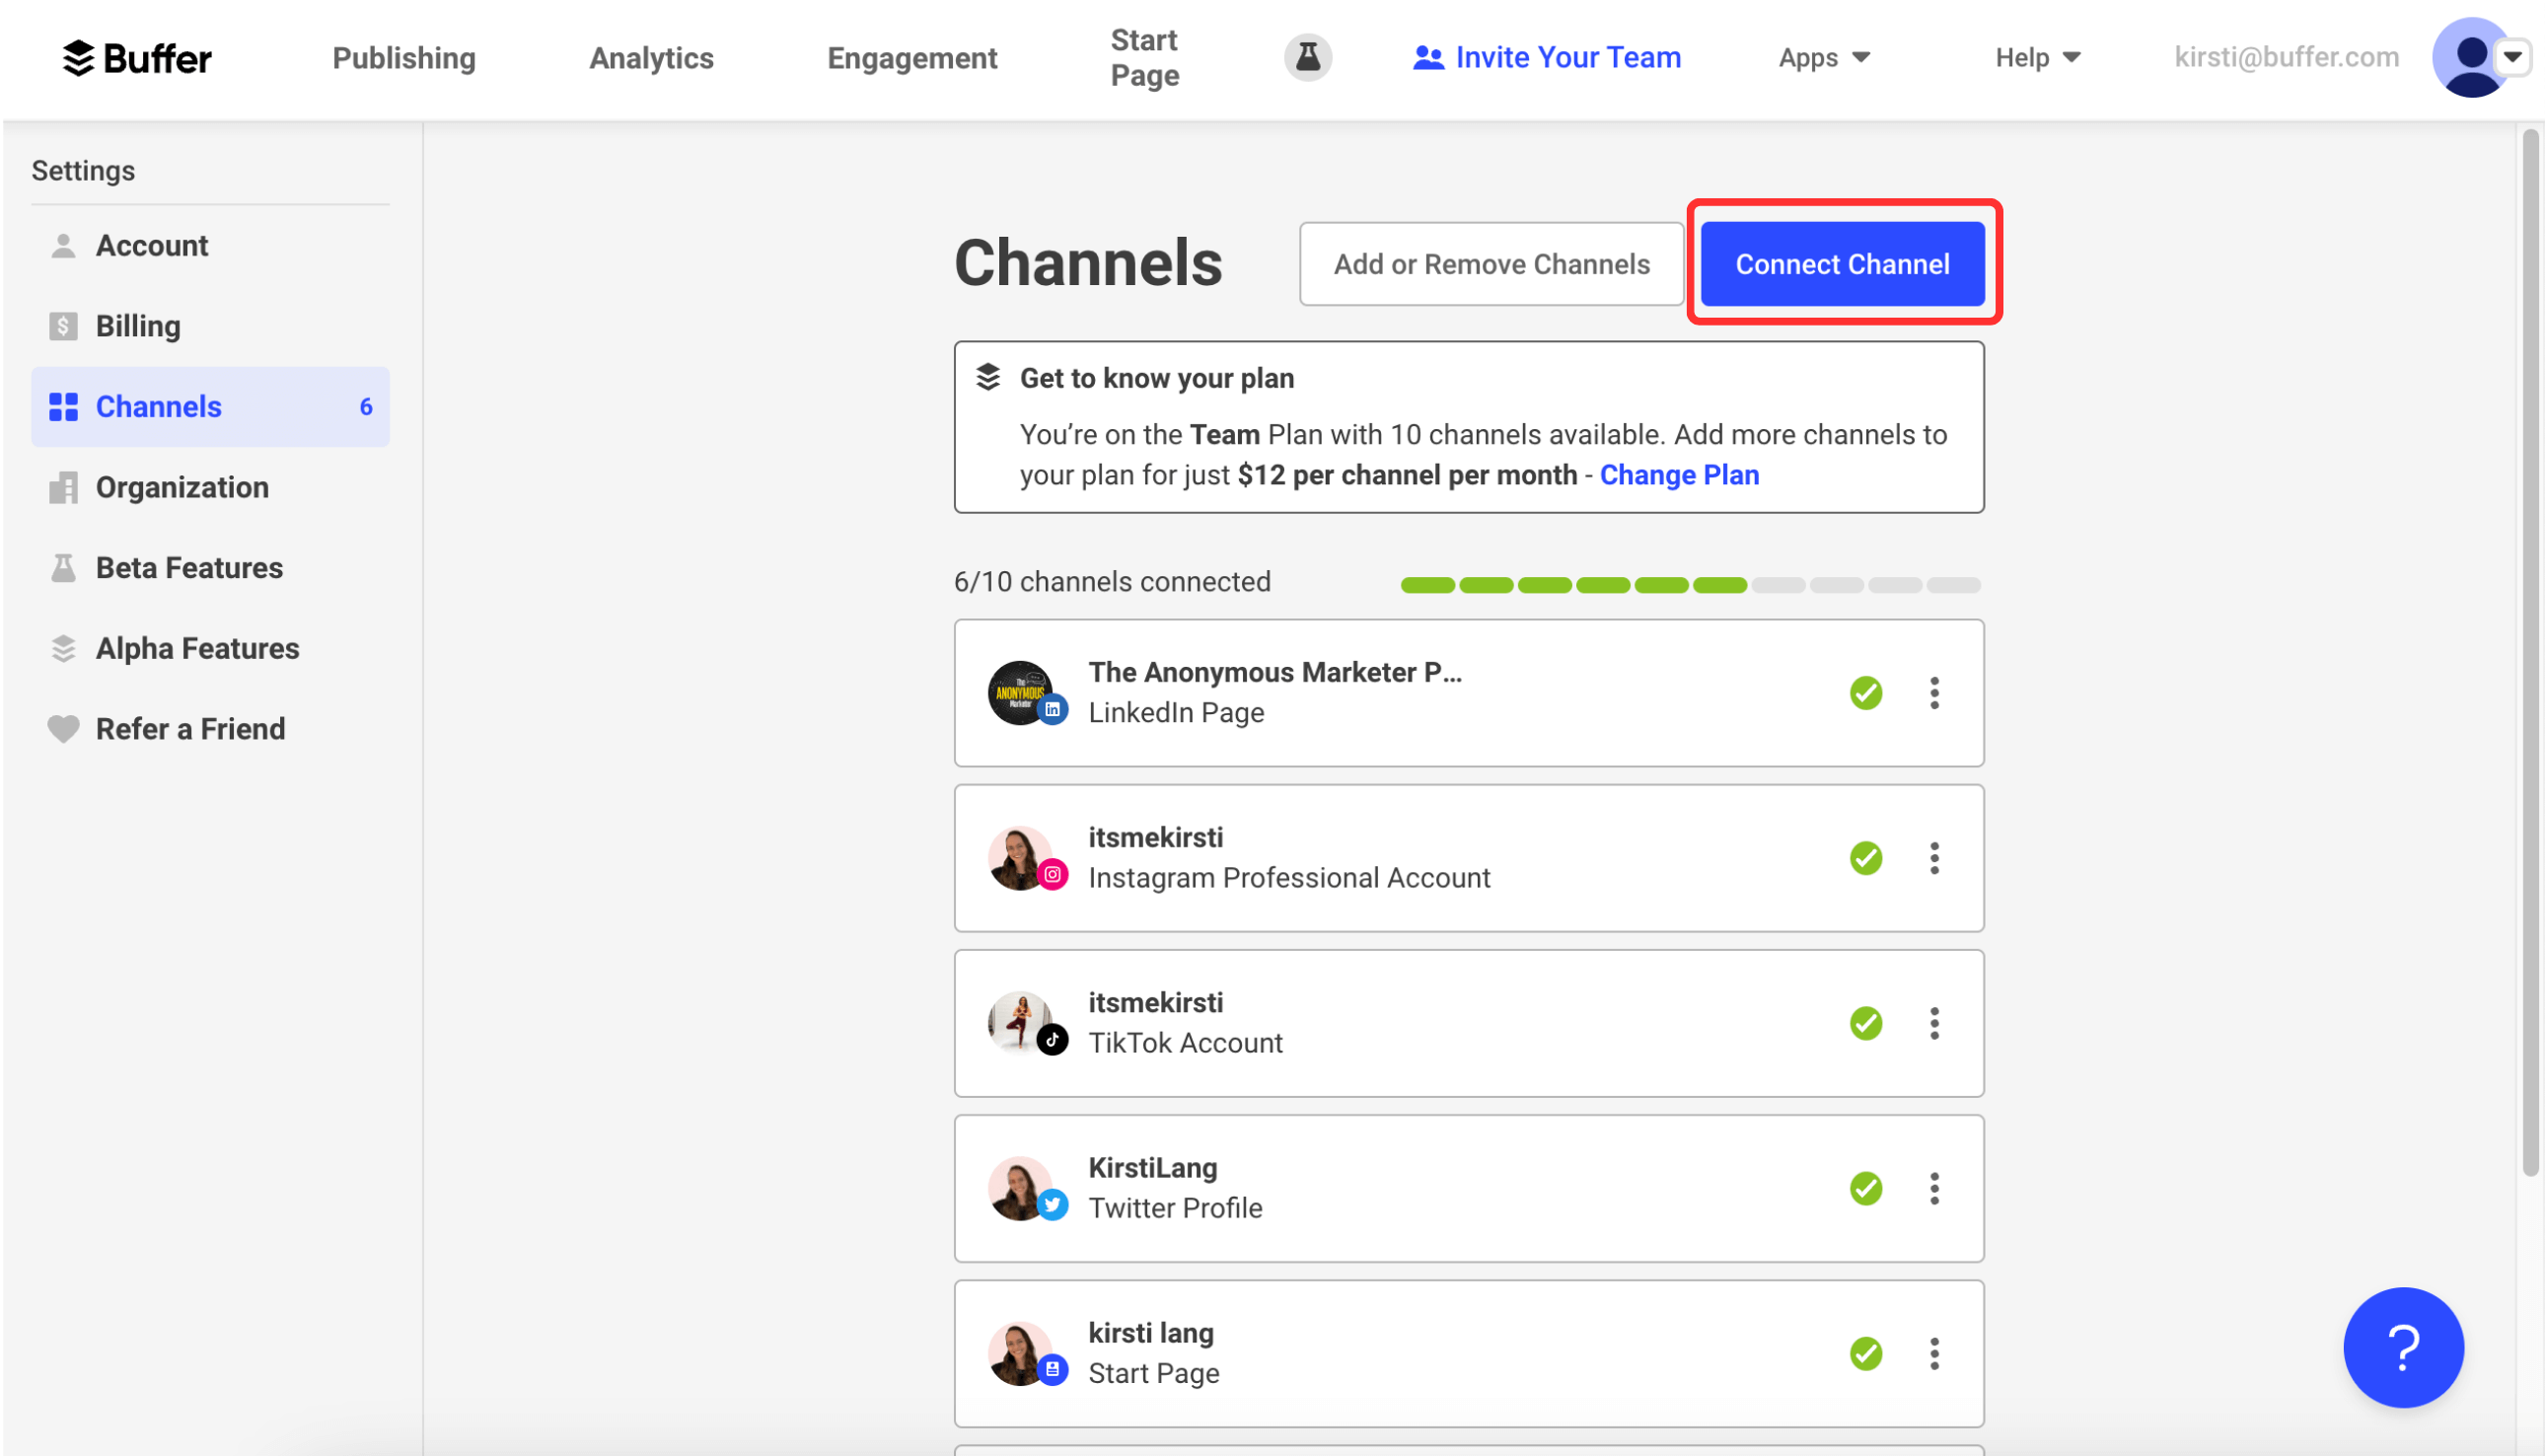
The process is pretty straightforward, but we have an in-depth guide to connecting channels in Buffer in our help center, plus specific how-tos for each platform if you run into any problems.
3. Create your tagging system
Color coding is my organizational love language (you should see my bookshelf), so Buffer’s new feature addition, Tags, has changed the game for me when it comes to content planning.
There are a host of ways to use Tags that will be incredibly useful in your social media management system. You could use them to tag posts by:
- Content pillar (my personal favorite)
- Post status (idea, draft, ready to publish)
- Format or type of content (text, video, photo, carousel)
- Platform (while you’ll be able to see which social media app your post is scheduled on in the calendar, this could be useful if you’re also saving ideas here for, say, a blog)
What’s really neat about Tags is that they translate over to the Analytics section, too, so you can measure up the performance of one grouping against another. This has been incredibly useful for me as I experiment with my content pillars to see which resonate the most with my audience.
To create your Tags, click on Publishing at the top left of the screen, then Create just beneath that.
Then head over to Manage Tags on the bottom left of your screen and click Create Tag on the top right.
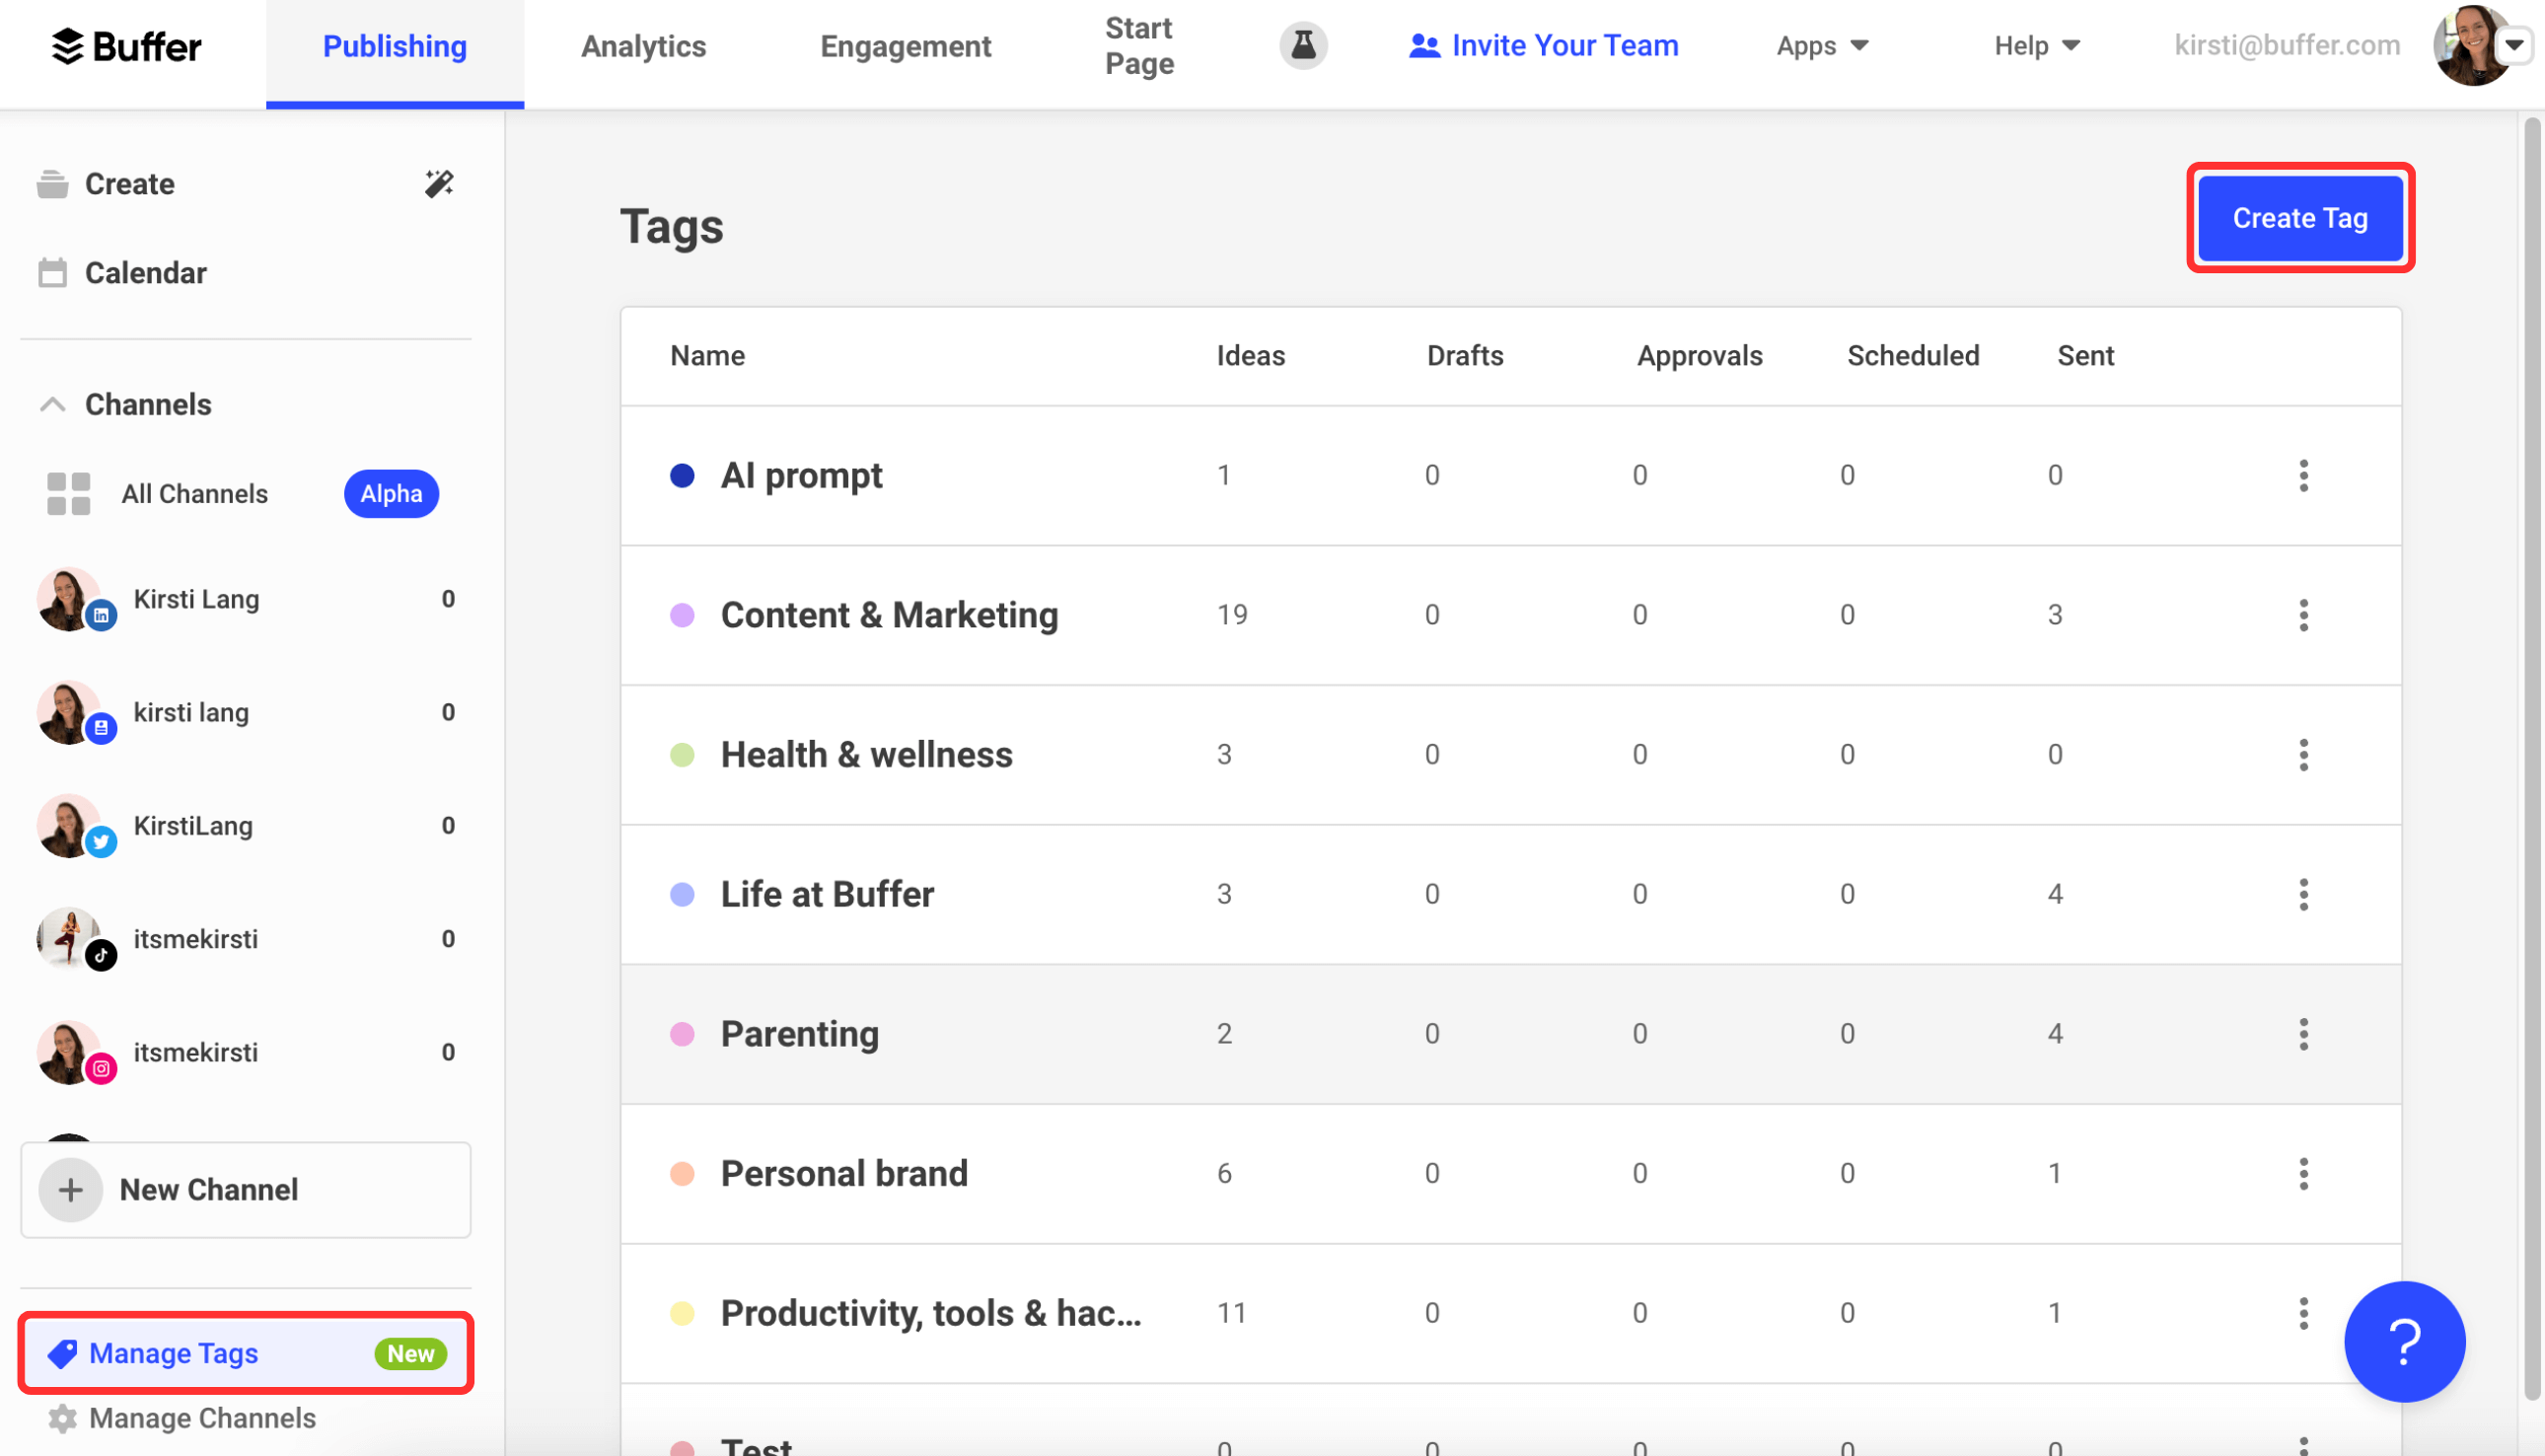
A pop-up will appear where you can add your tag name and choose a color to represent it. (All the color options were specifically chosen because they work well together, so any combination will be aesthetically pleasing if, like me, you’re into that!)

4. Get your ideas down
Ready for a brain dump? You likely have a solid idea of the kind of content you’re creating thanks to your strategy work in Step 1. Now, it’s time to roll up your sleeves and get to work on the actual content creation.
This is where Buffer’s Create space comes in. It’s a versatile system that you can use in plenty of different ways, but if you’re working on building out your calendar, I’d advise you start by using it as a hub for all your ideas. As a creator, anything I share on one of my social channels will start in this space first.
Top tip: Don’t worry about making all your social media posts beautiful right away. Even if all you have is a half-baked idea or a reminder about an important product launch, a brief note works just fine here, too. Just get it down — you can refine it later.
My posts often start out this way (like the Create cards you’ll see in the screenshot below), which I then flesh out as inspiration strikes and polish up before adding them to my calendar to schedule.
To create an idea, click Create in the top left corner, then Create Idea on the top right.
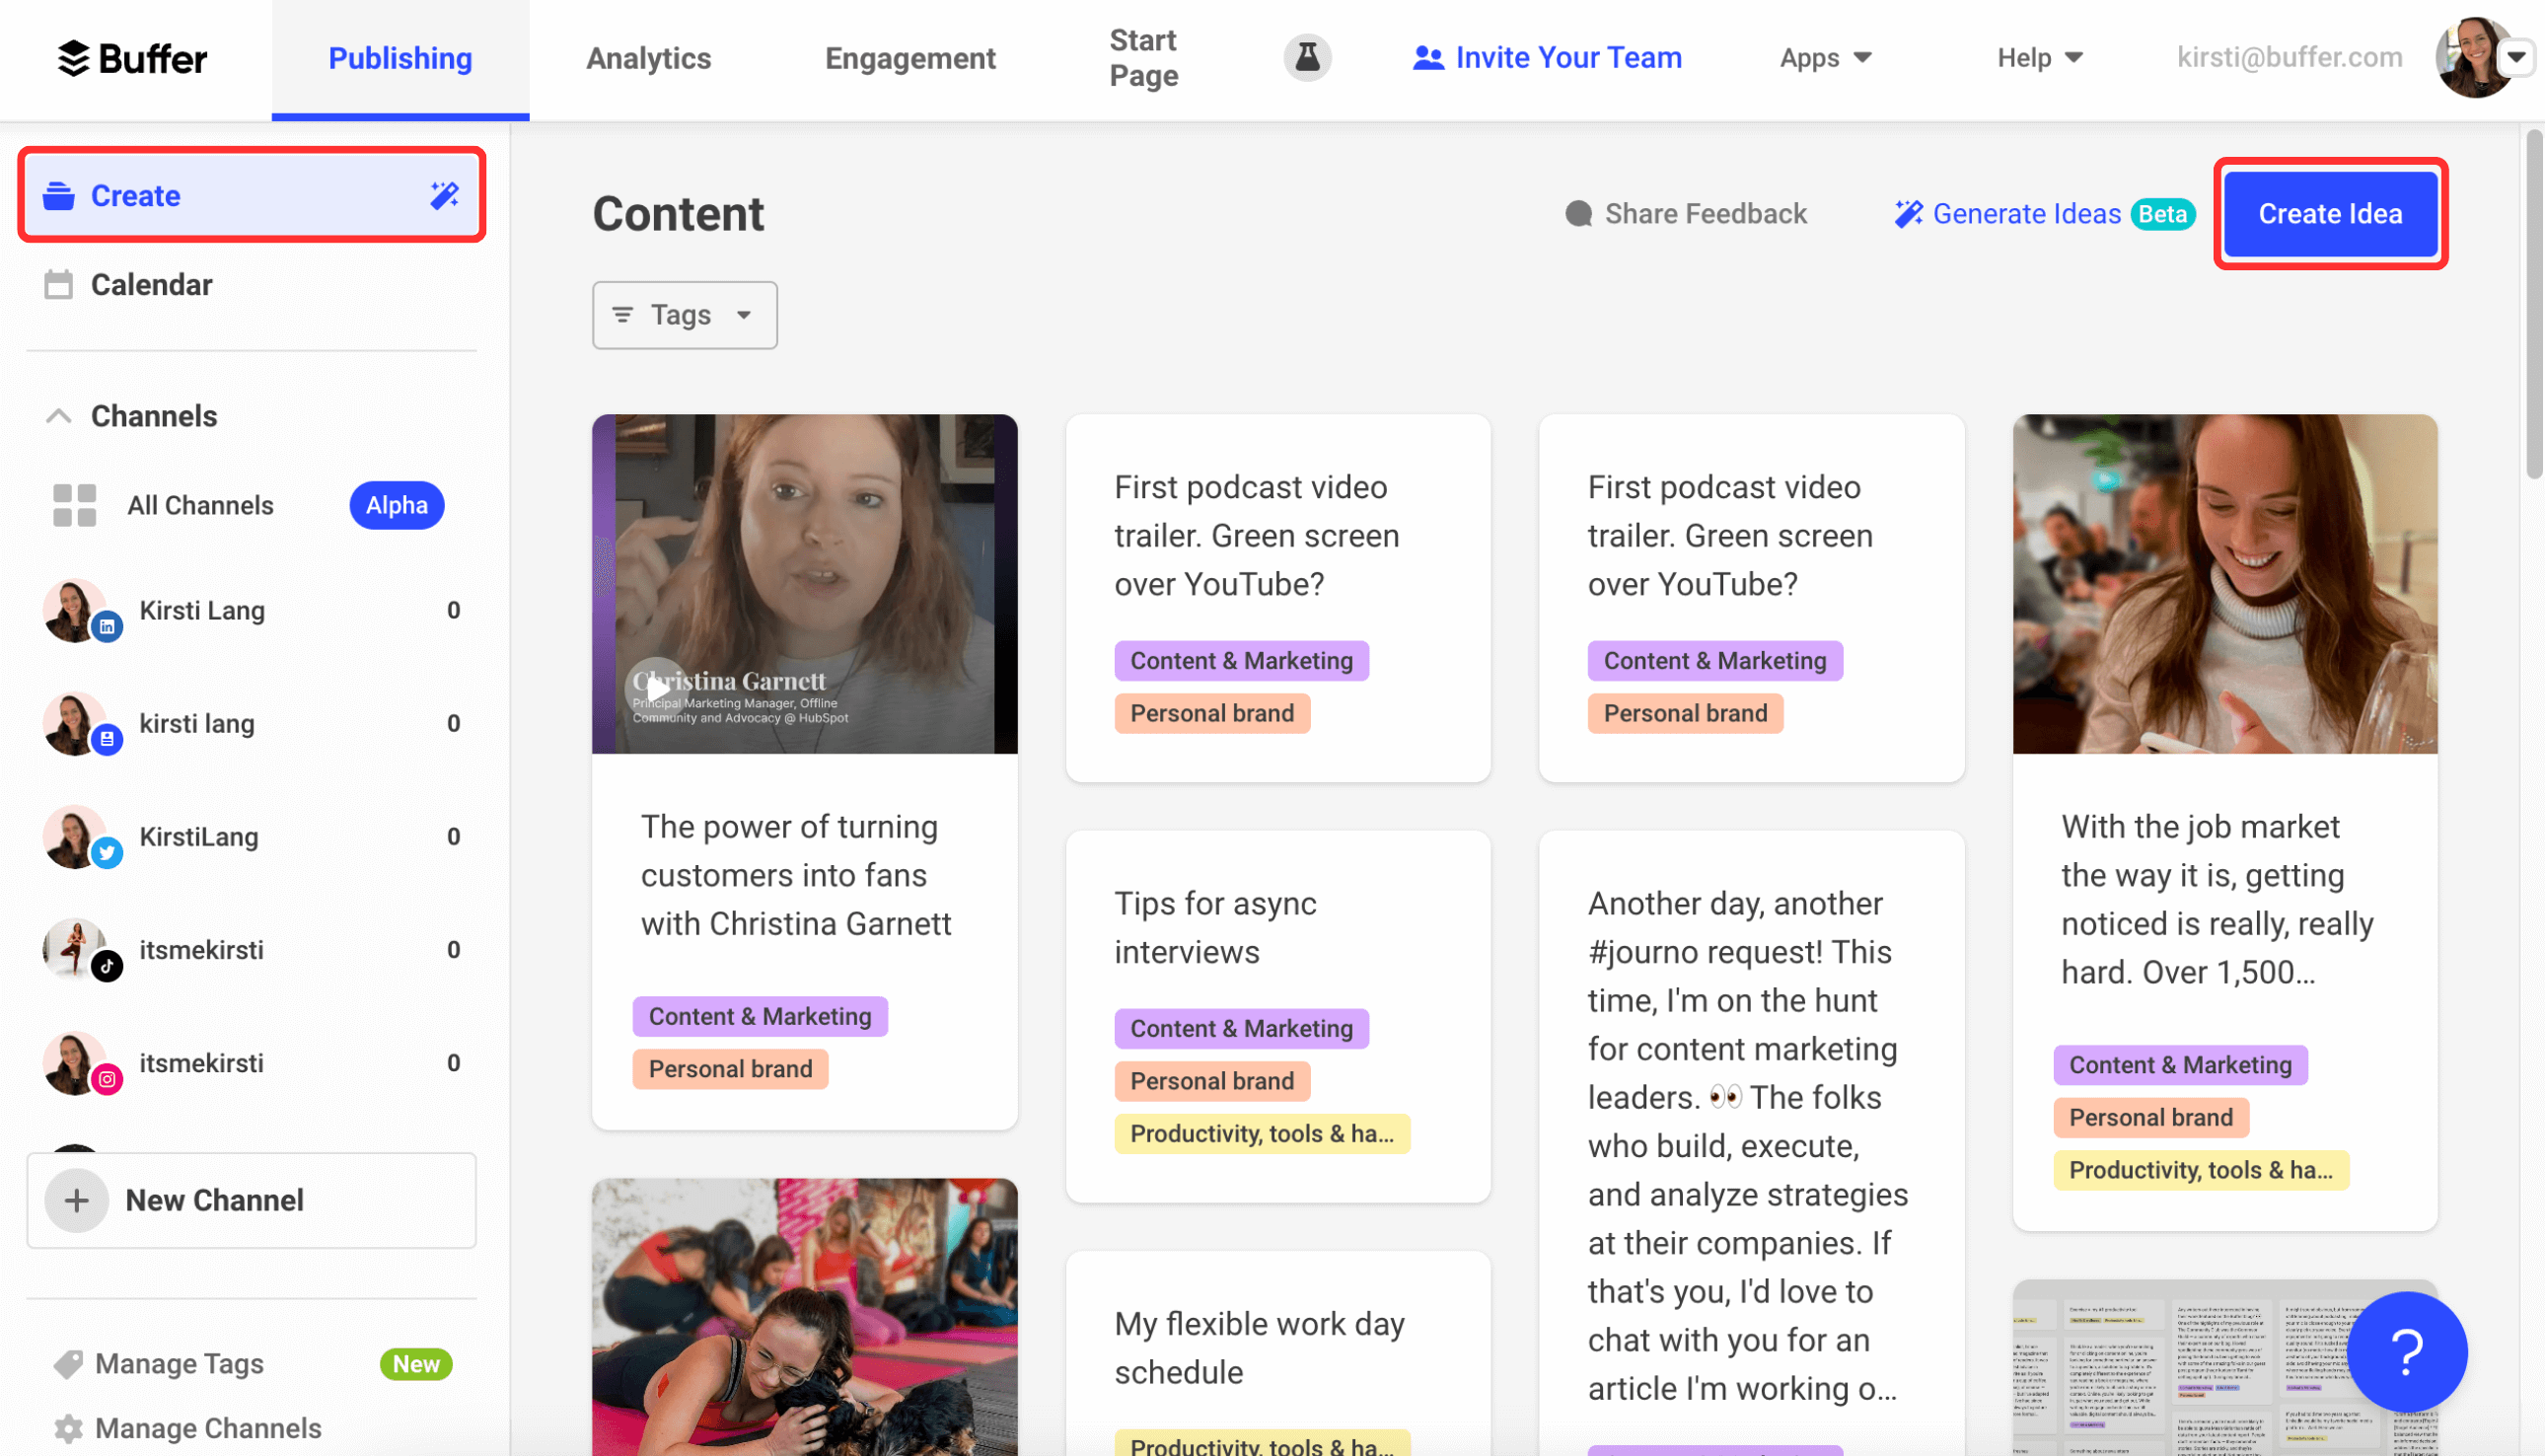
Right here, you can:
- Add your copy or caption (or placeholder text)
- Choose your Tag/s
- Add media, like video or photos
- Add directly from Buffer integrations (like Canva, Dropbox, Google Drive, Unsplash, and more)
- Get help from Buffer’s AI Assistant when you’re stuck
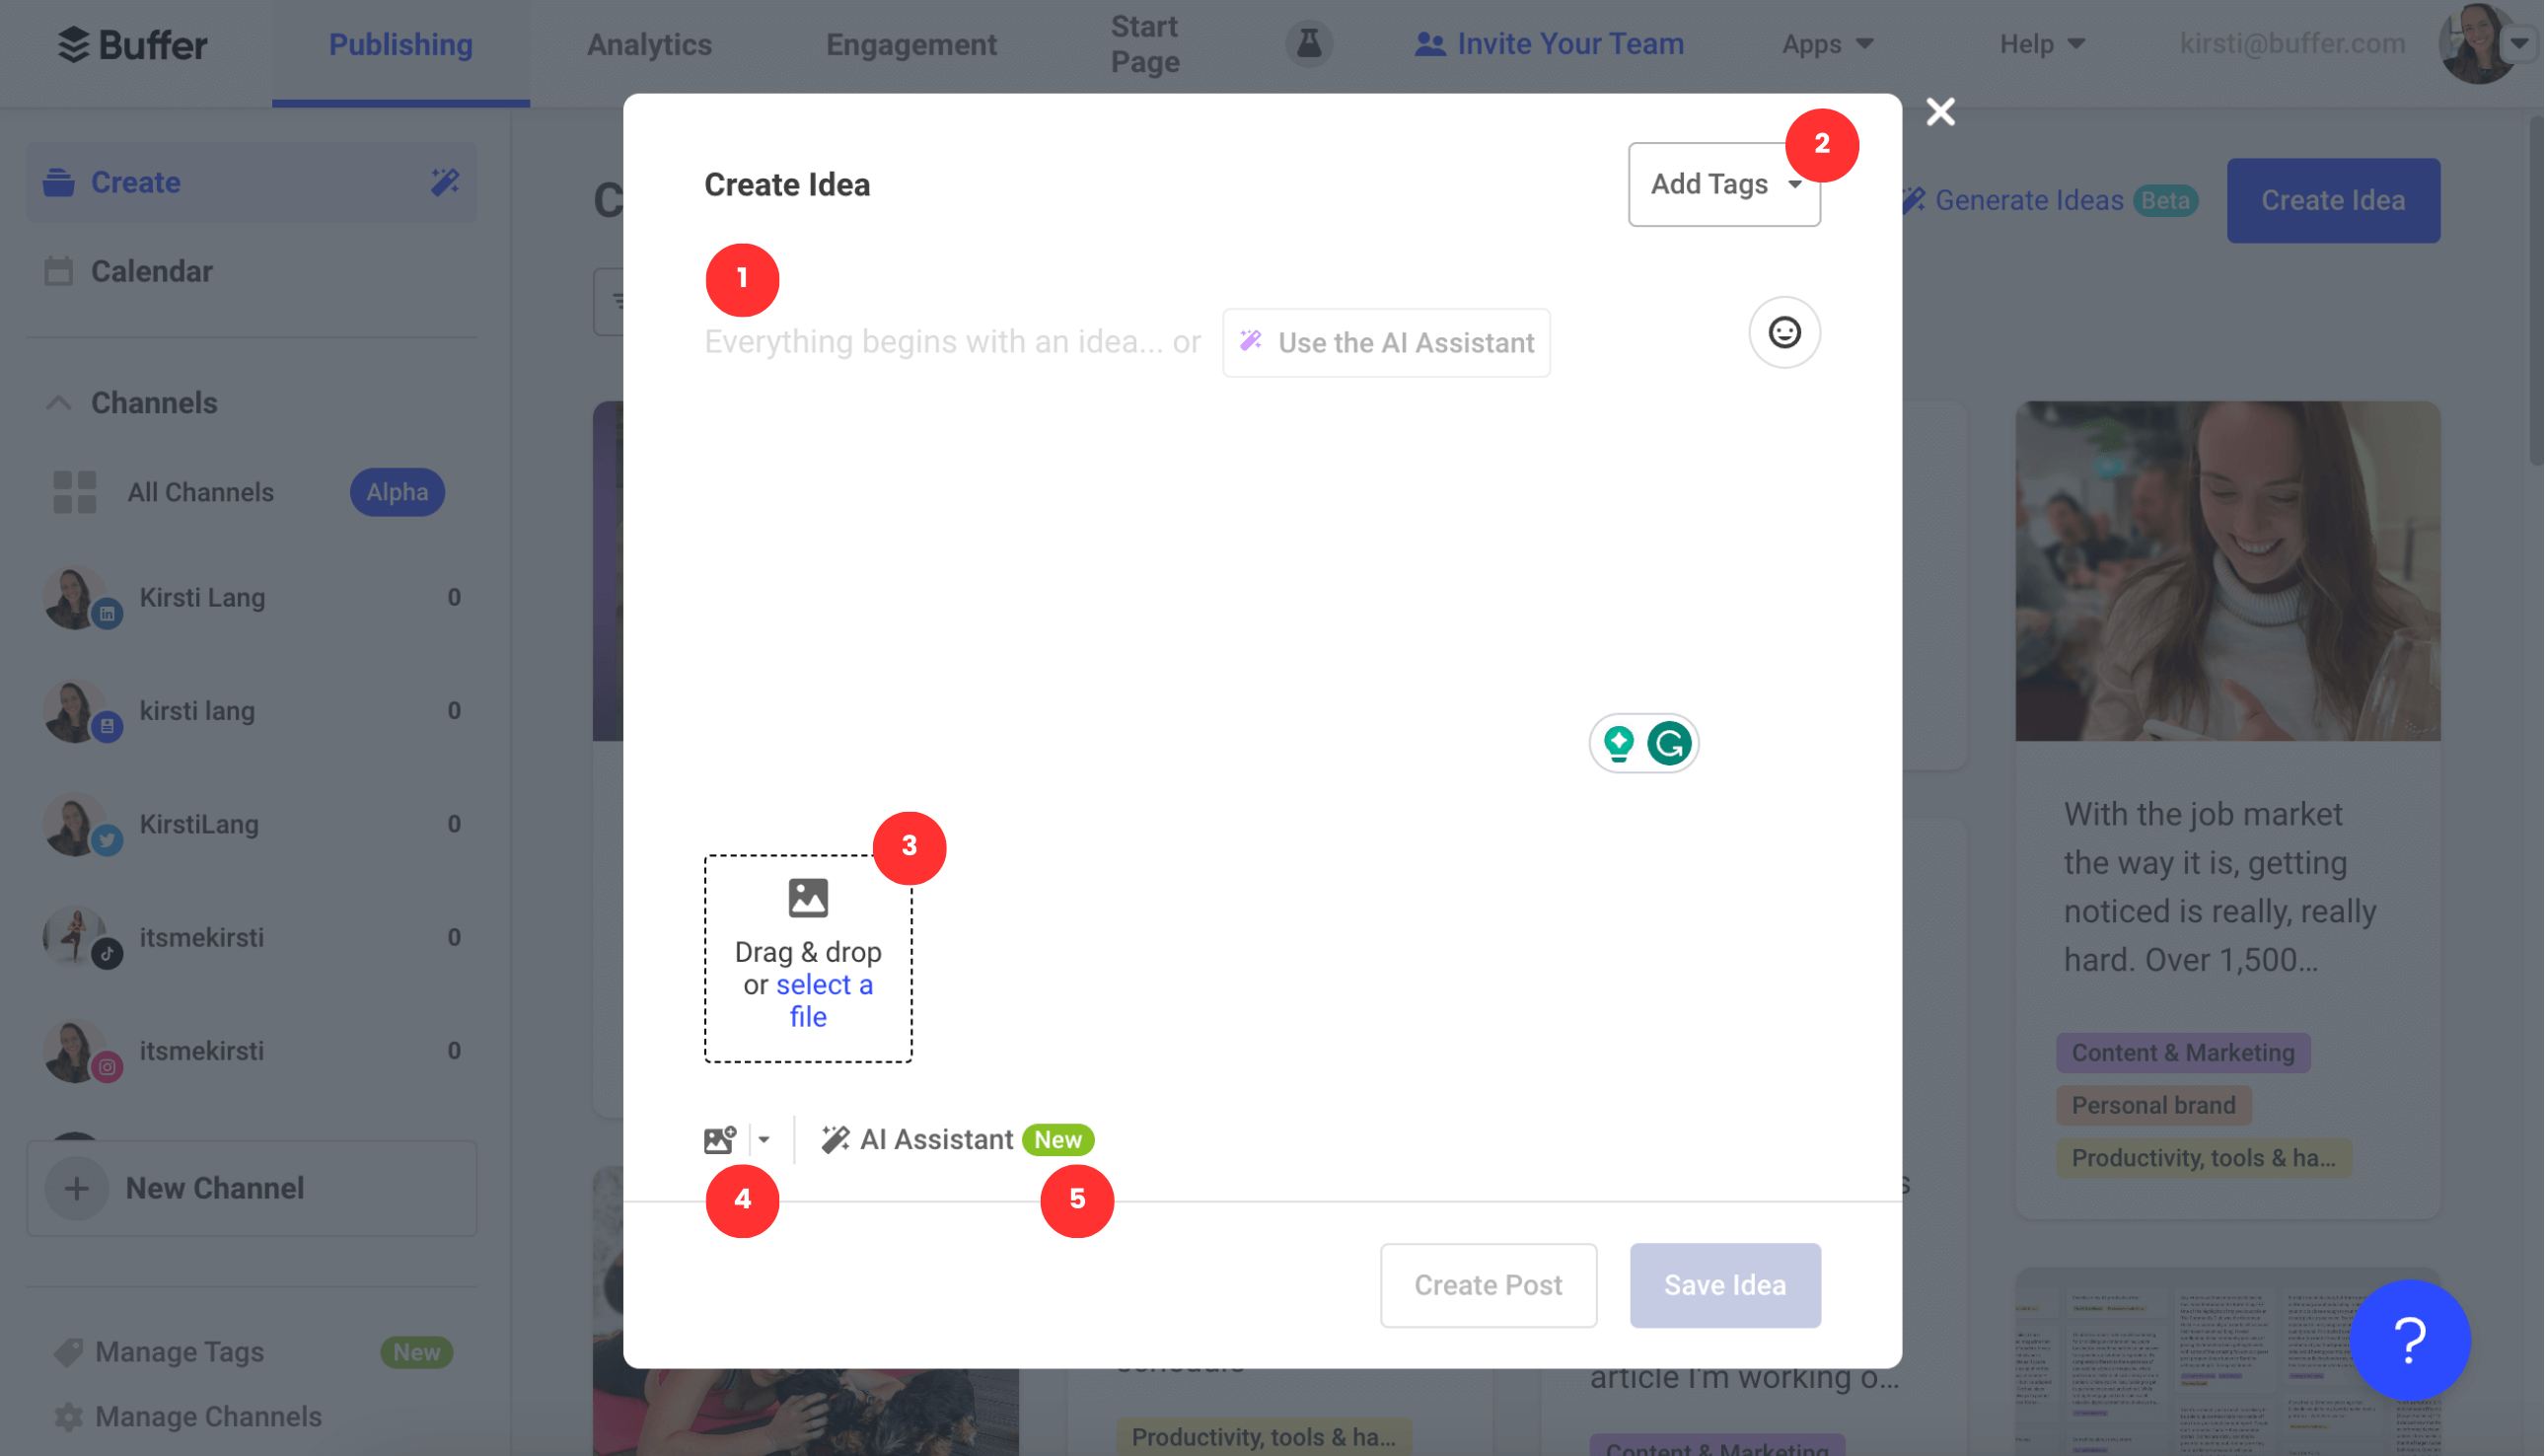
You can save the idea to keep it in your Create space by clicking the Save Idea button or scheduling it right away with the Create Post button (more on this below).
5. Set up your Queue
At Buffer, we think of the posting schedule for every social media platform as a Queue — basically, set time slots every week for posting.
You don’t have to stick to this, of course, but it’s a really handy way to commit to the cadence you laid out in your social media strategy. As time goes on and you experiment with different timings and frequencies on all the platforms you’re using, you’ll be able to pinpoint the slots that work well for your target audience.
When you first start with Buffer, the platform will automatically assign times in your Queue. (Don’t worry, this doesn’t mean that something will automatically be published. Think of these times as empty placeholders posting slots that you can use, tweak, or leave as you see fit.)
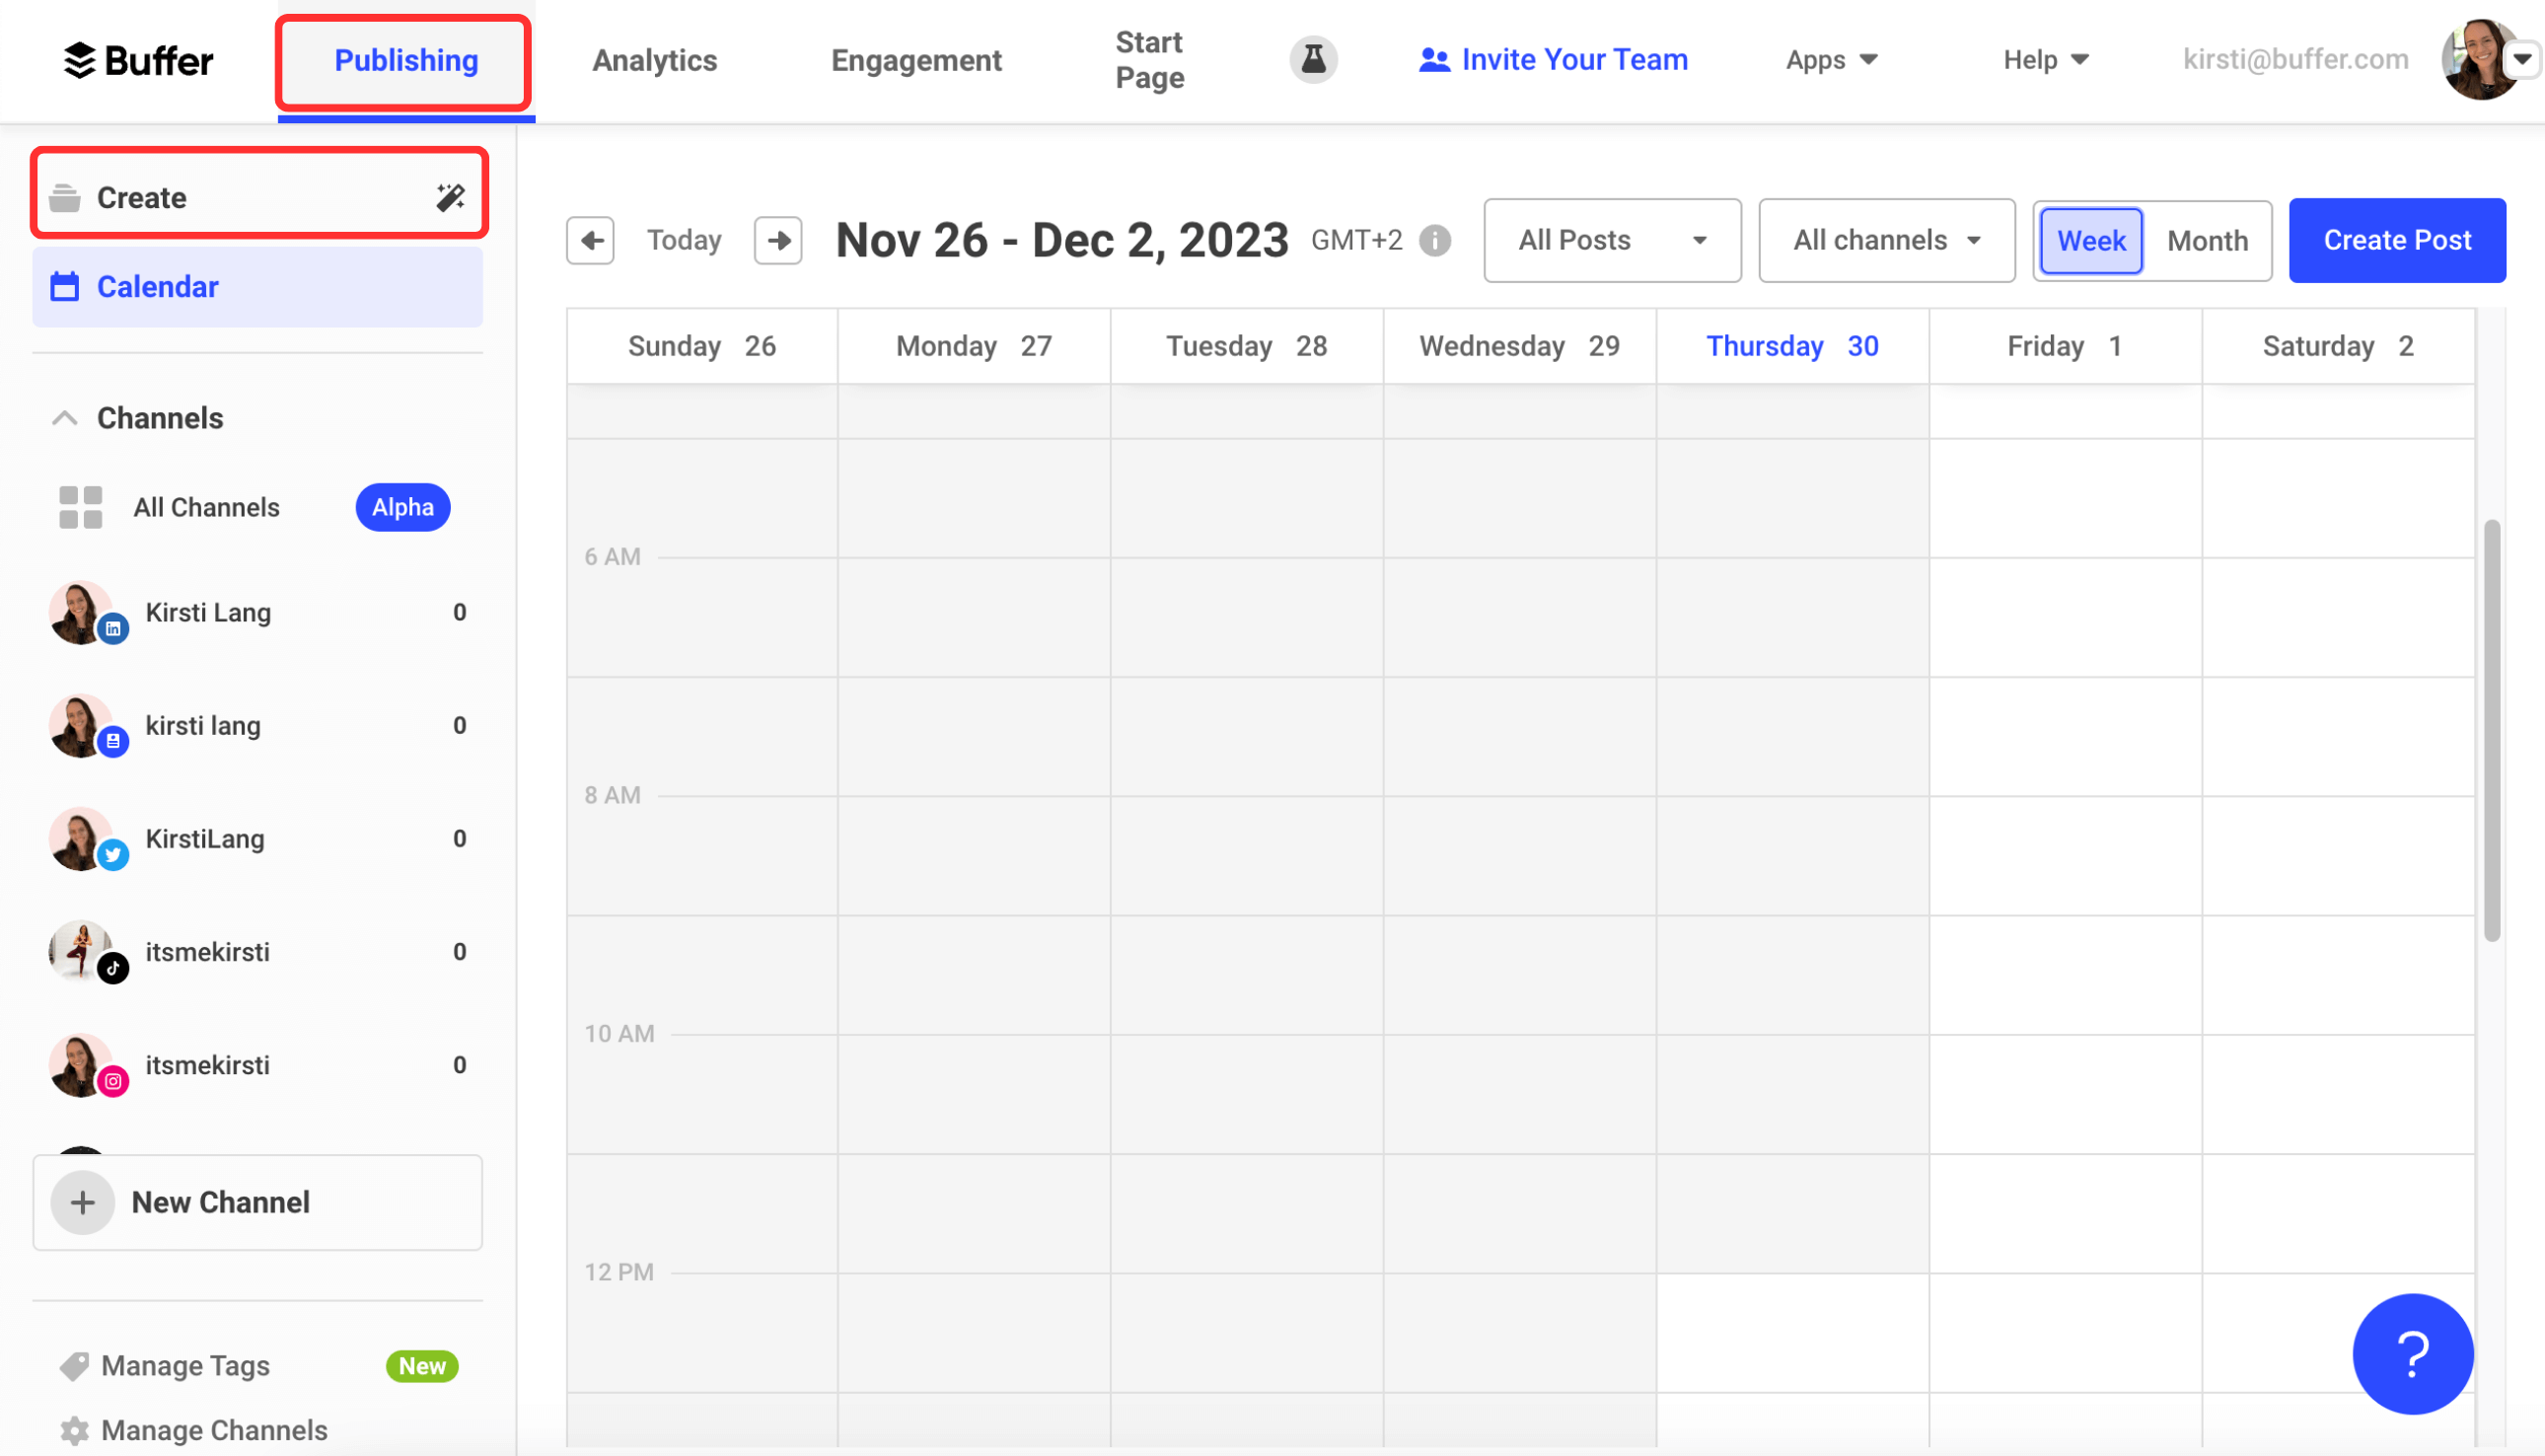
To set up your Queue, click on Publishing on the top left, then choose the channel you want to tweak in the list on the left-hand side.
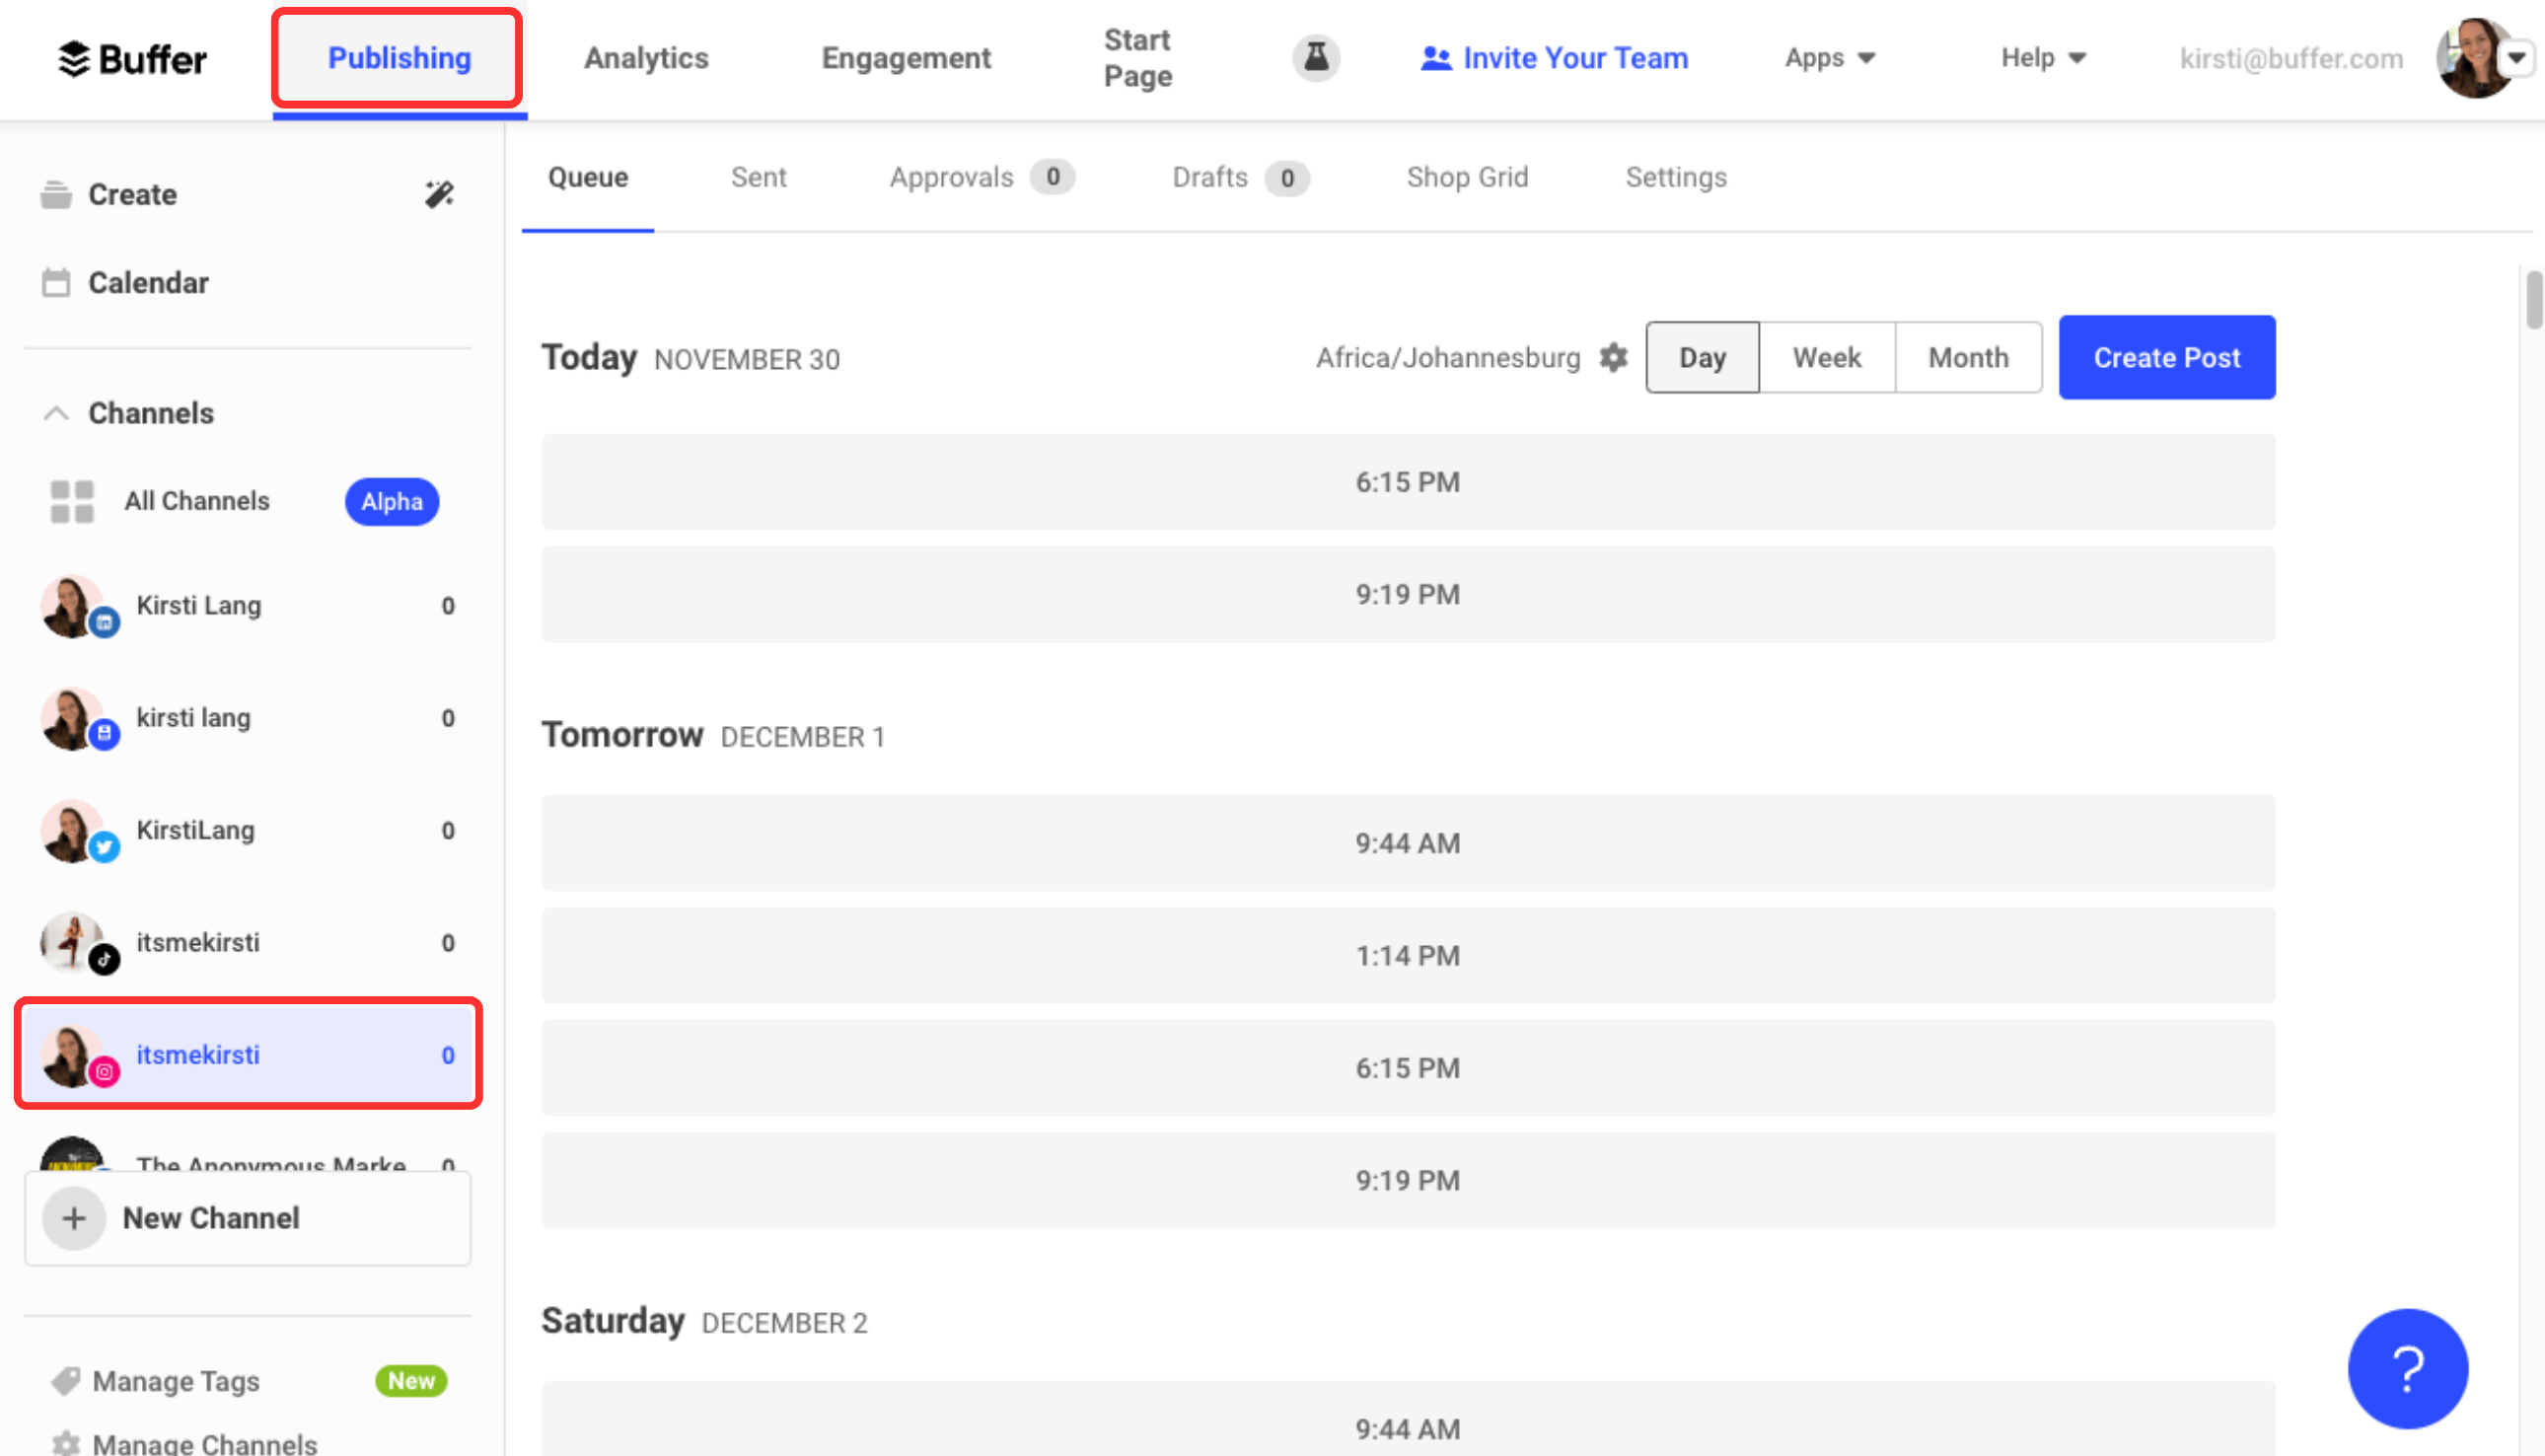
On the right of the window, you’ll see the Queue that Buffer has automatically created for the channel. To change your Queue times, click on the gear icon next to your chosen time zone.
Here in the posting schedule settings, you can:
- Add a new posting time
- Turn off posting on specific days
- Remove times from your current schedule (hover over the time, then click on the arrow that pops up)
- Clear your Queue completely
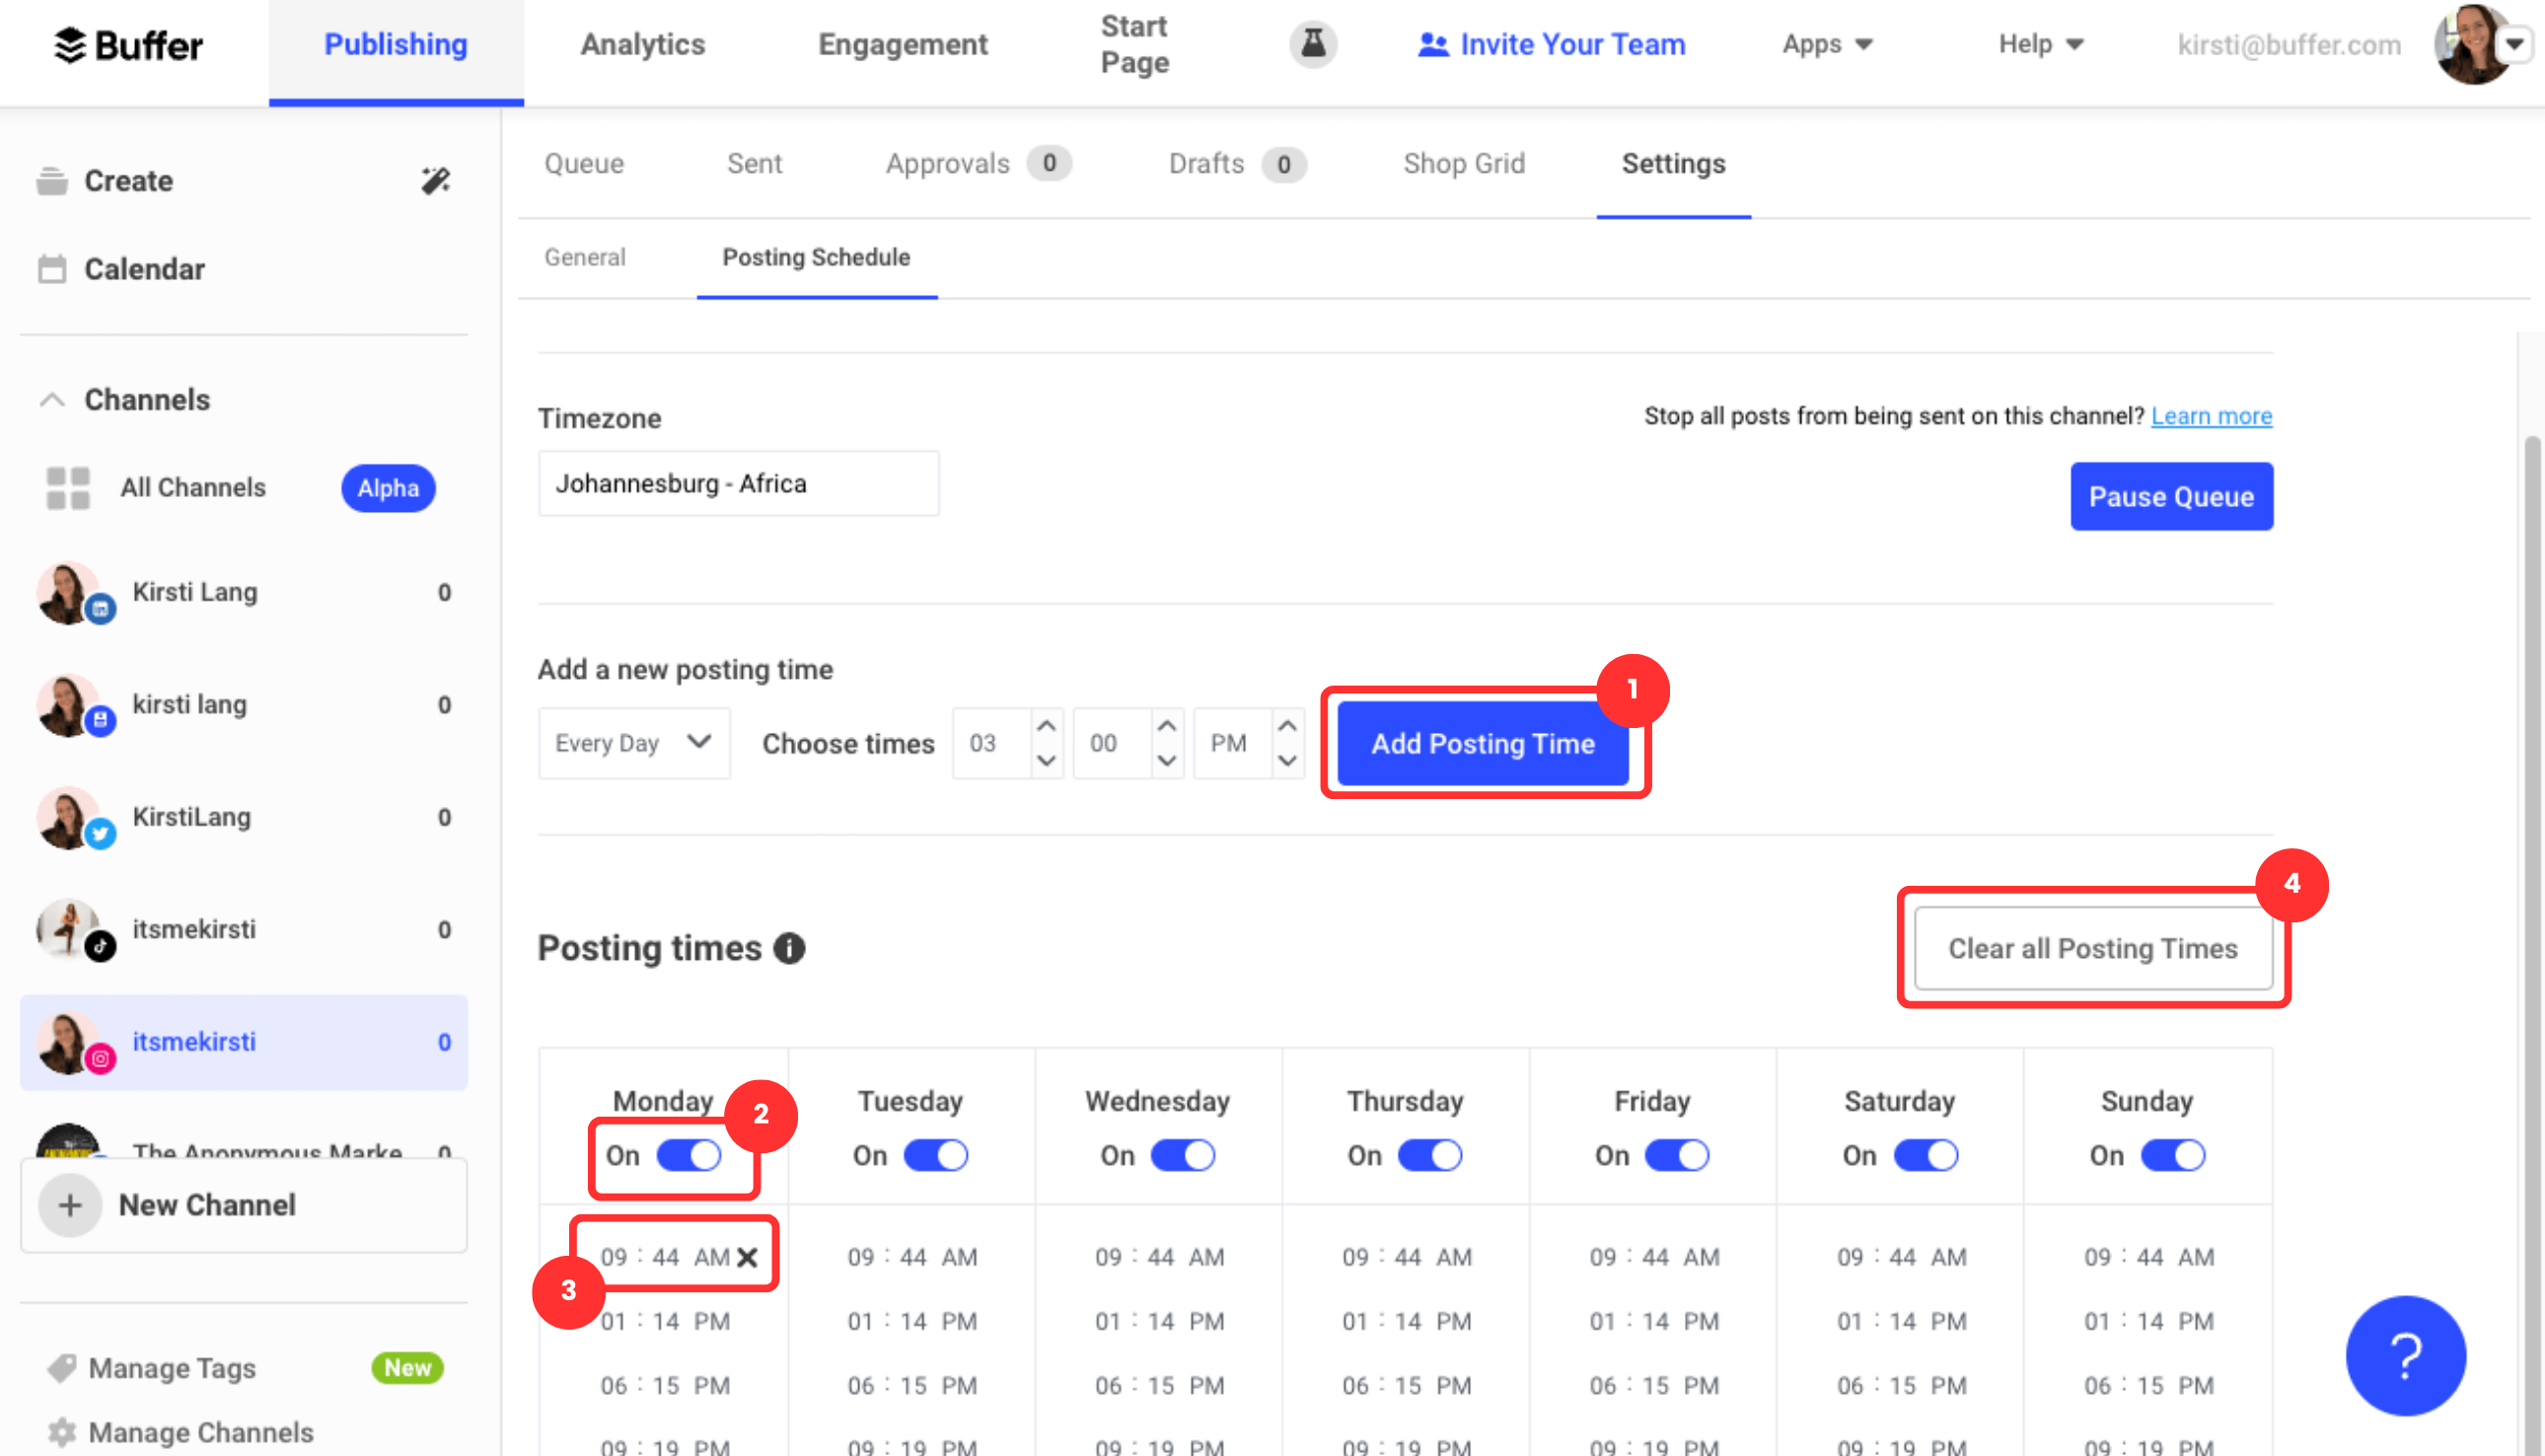
You might choose to leave these slots as is — you can edit your scheduled times in the calendar, after all — but it’s a good idea to be aware of the Queue timings for all your channels (you’ll see why in Step 6 below).
6. Start planning
Now that you have a host of great ideas ready and waiting to be published on your social media channels, it’s finally time to get them on the calendar.
To do so, select an idea that’s ready to go in Create. Then click on the Create Post button at the bottom of the pop-up.
Next, choose which channels you want to post the update on.
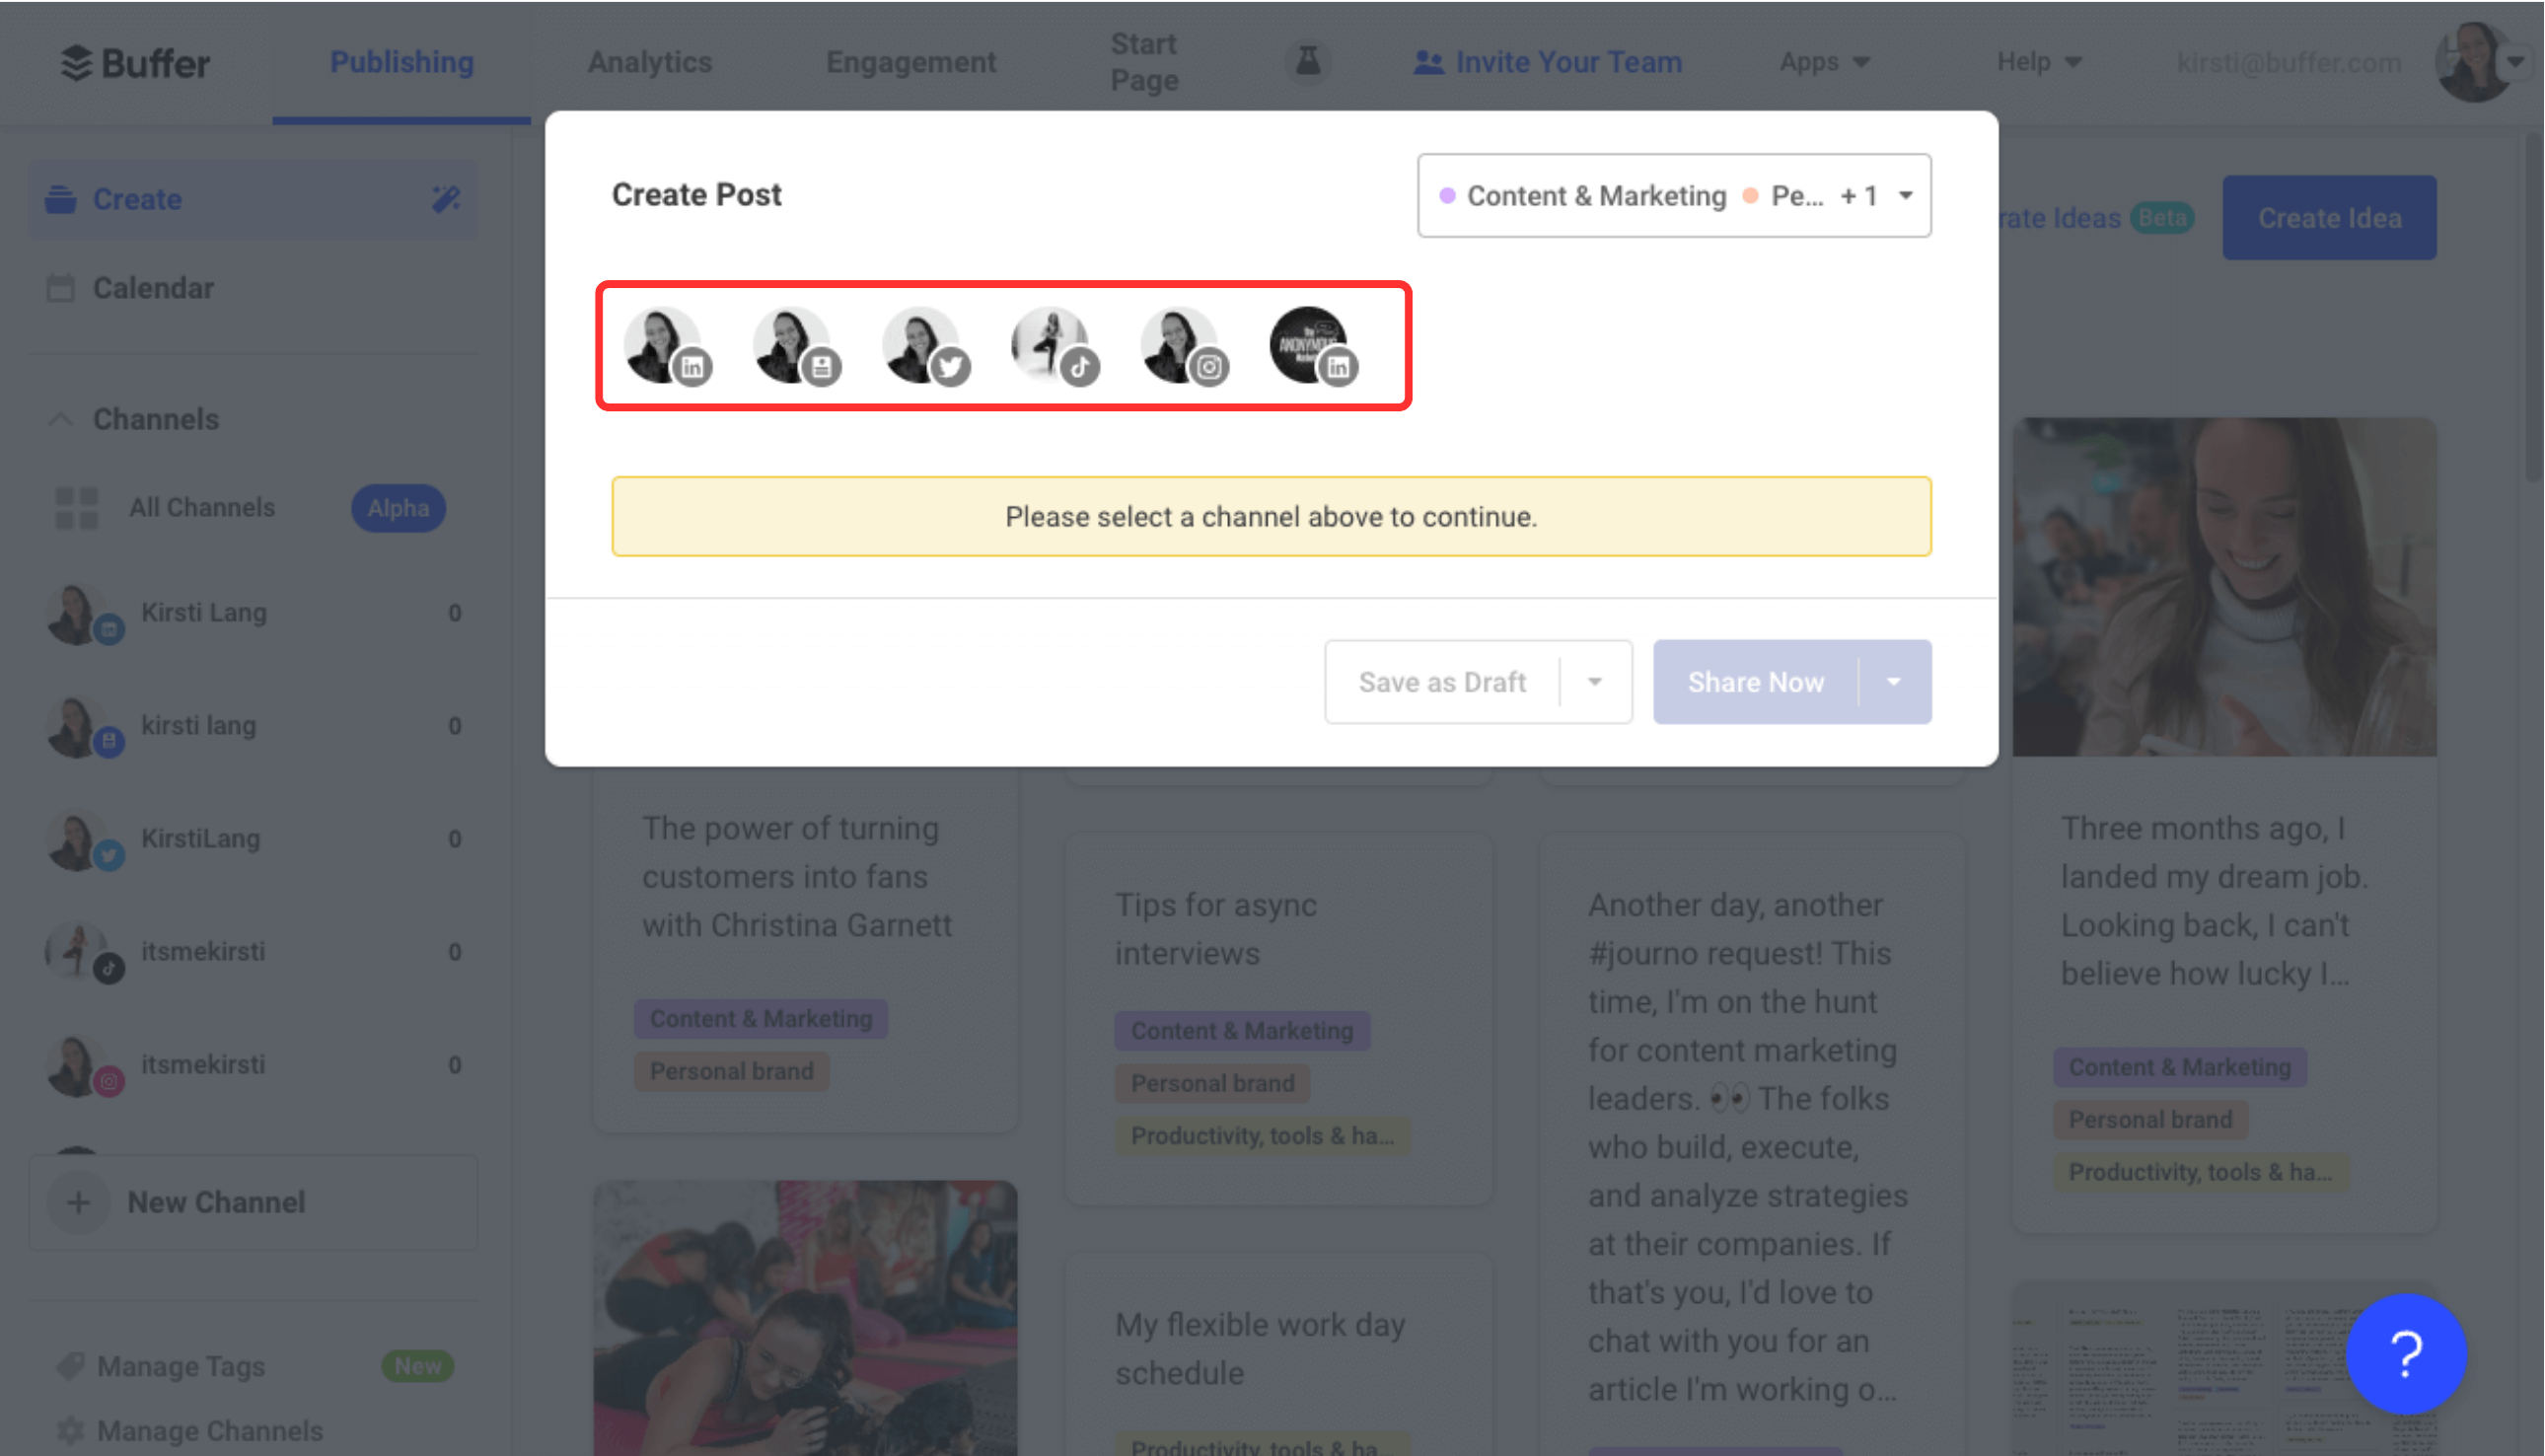
If you’ve selected multiple platforms, scroll down within the window to tailor each one for the social network it’s going on. Buffer will let you know if the post fits into the limitations (like text, or video, or photo size and dimensions) for each channel.
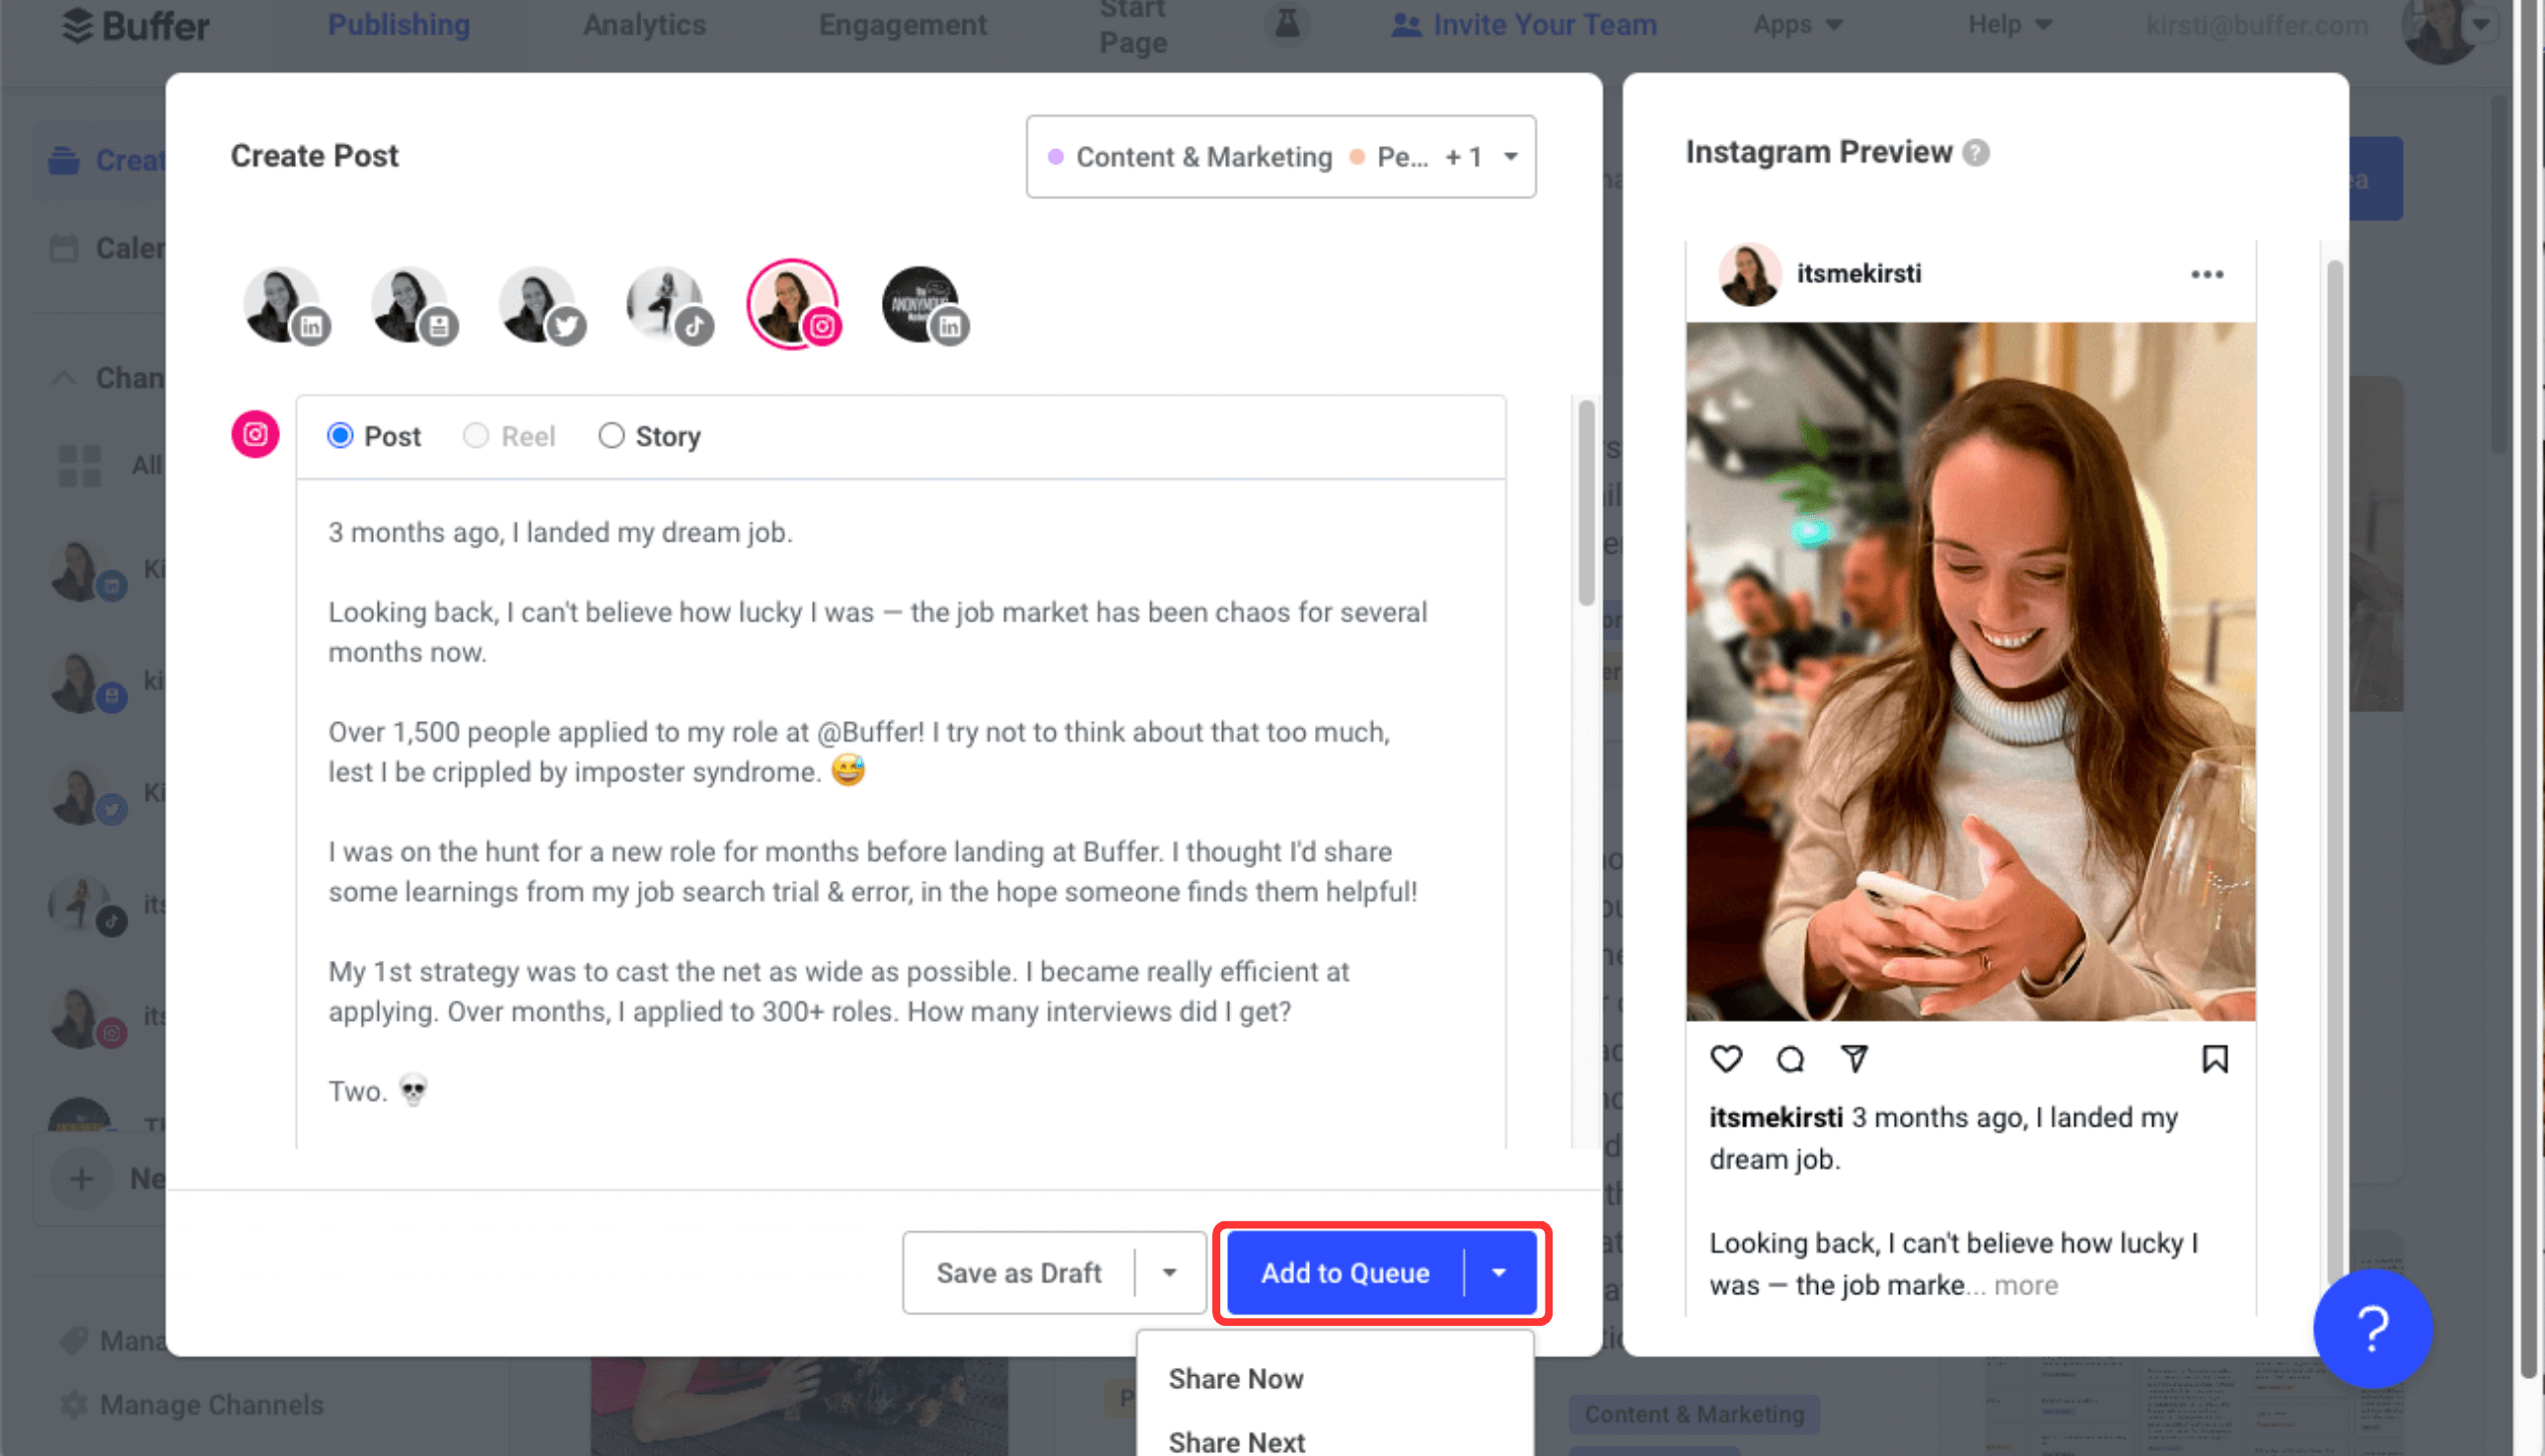
Choose Add to Queue. This schedules your post for the next available slot in your Queue, leaving any other posts you already have scheduled in place. Don’t worry, you can still tweak this time slot!
You can also click on the dropdown arrow to Share Next (go to the very next spot in your Queue, bumping any other content already in that slot to the next slot) or Share Now (publish right away).
Of course, you don’t definitely have to start putting your posts together in Create — you can create new content directly in the Calendar, too.
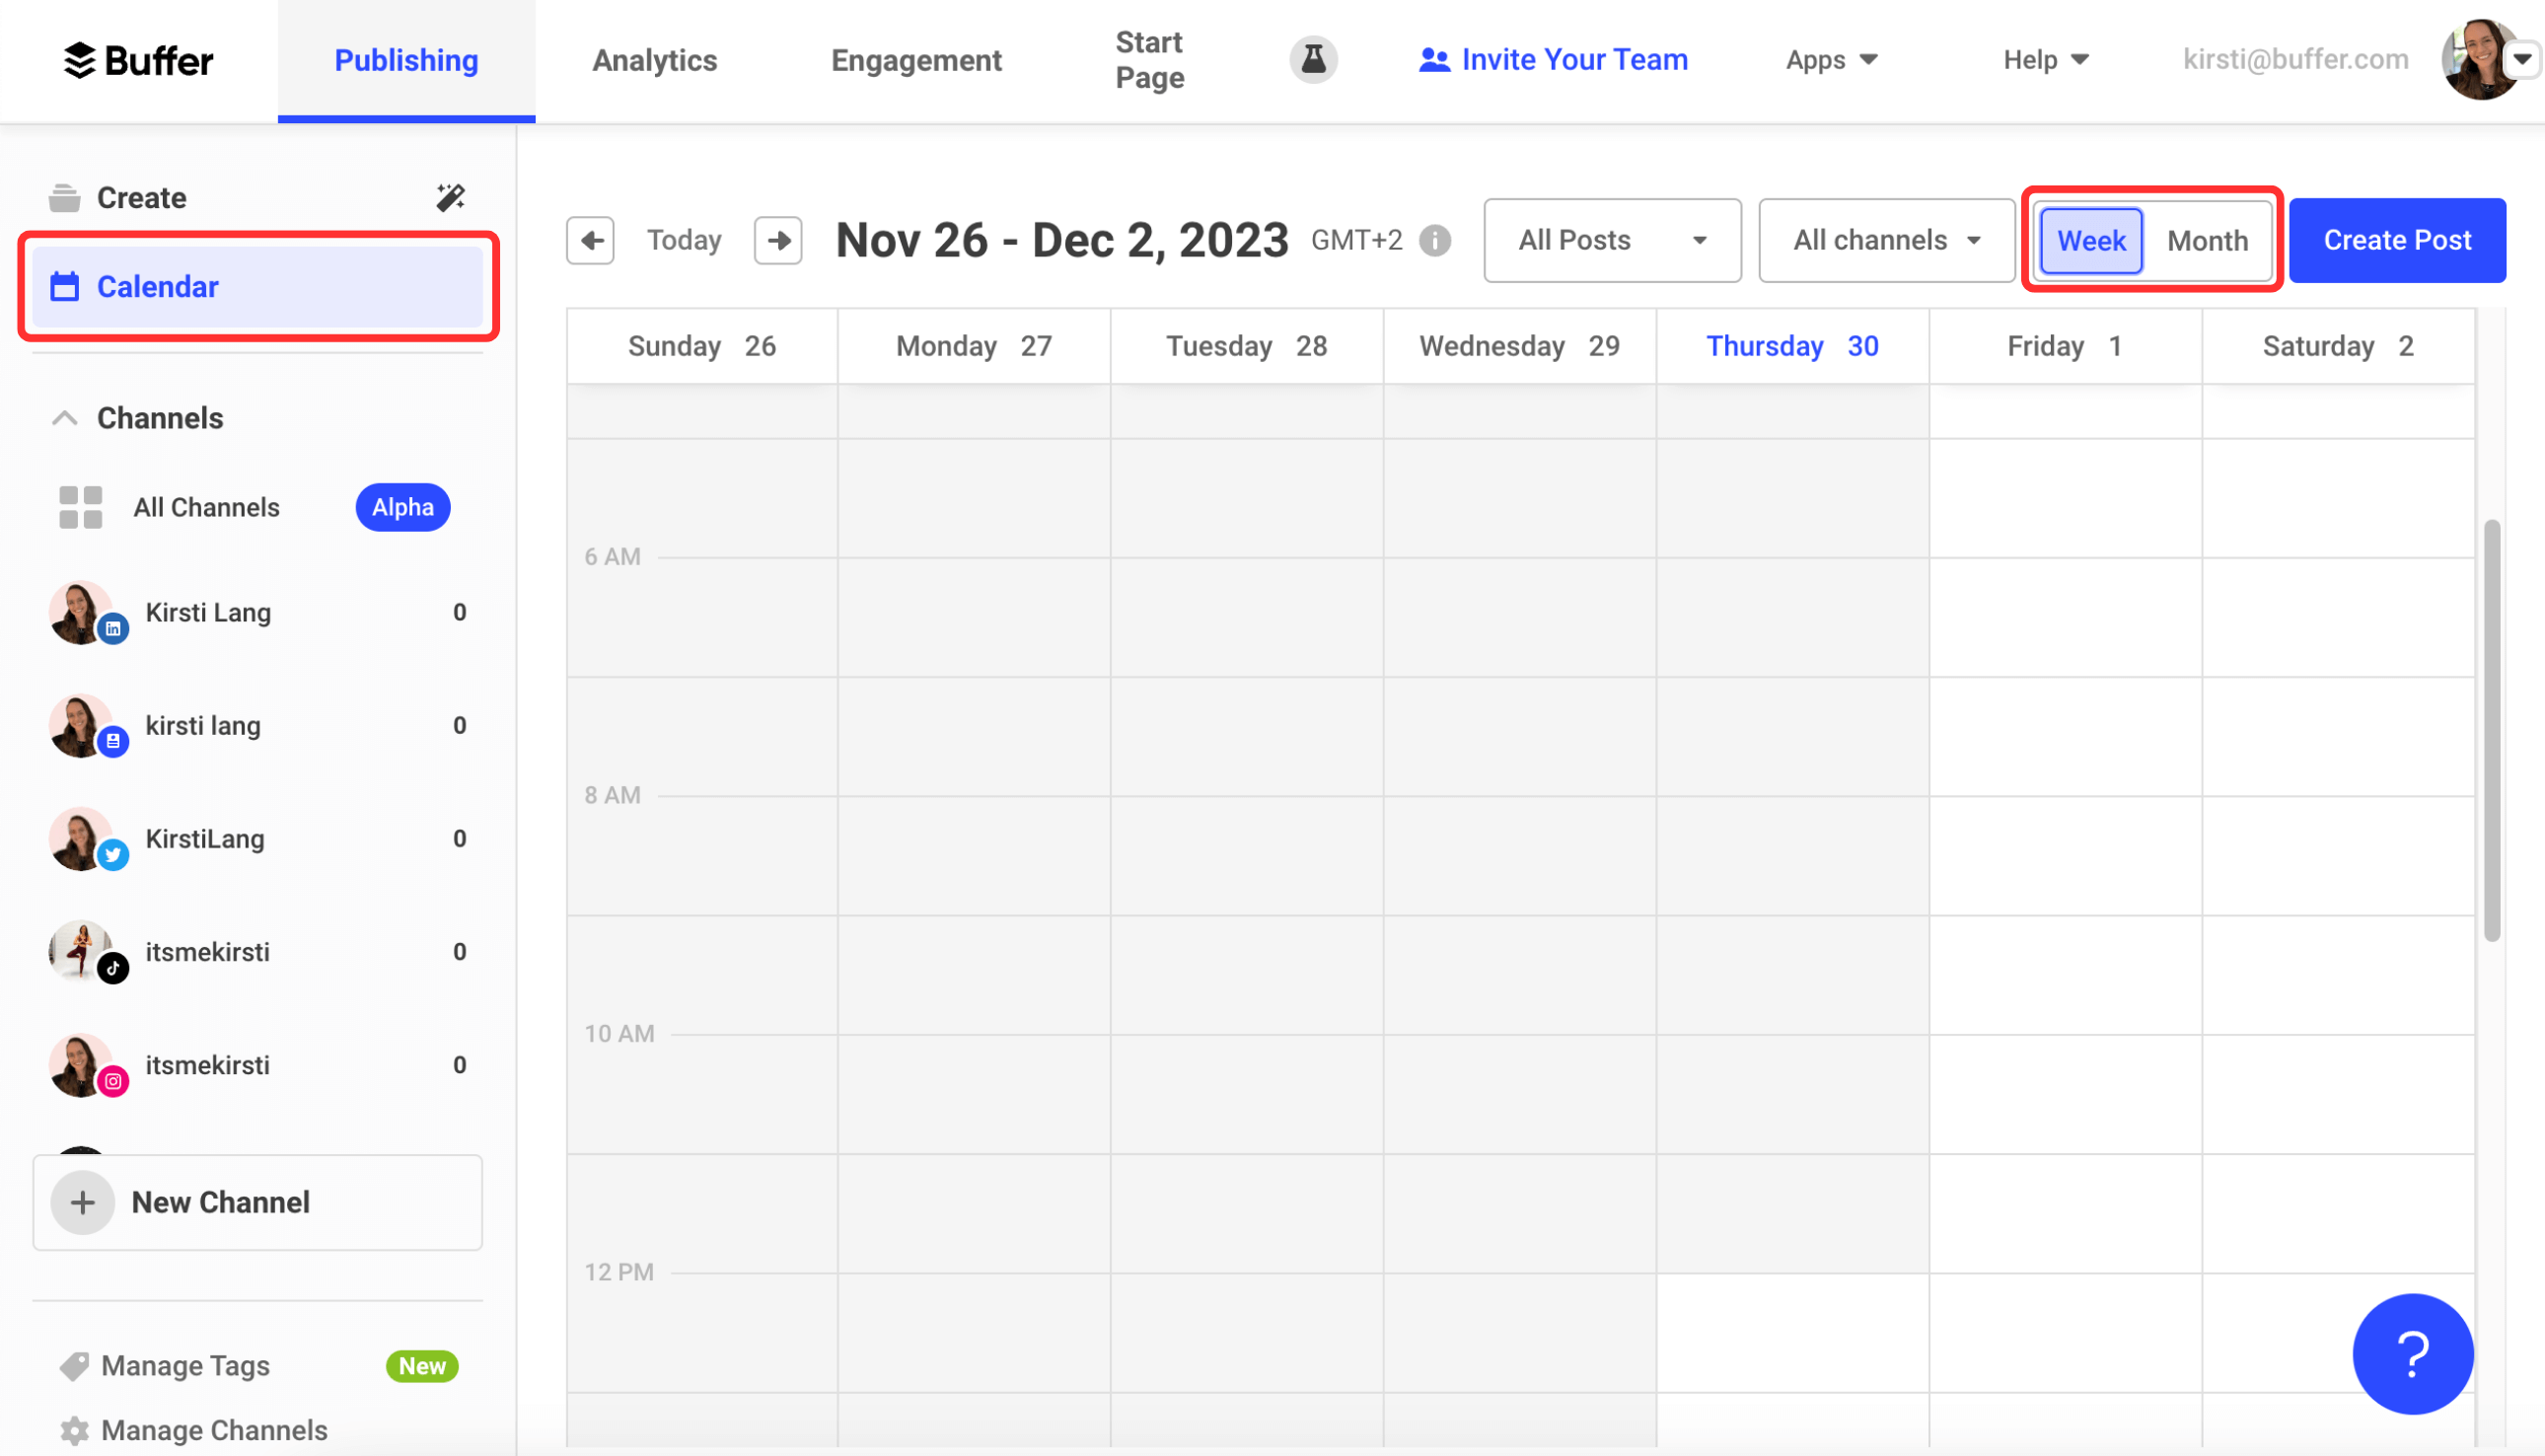
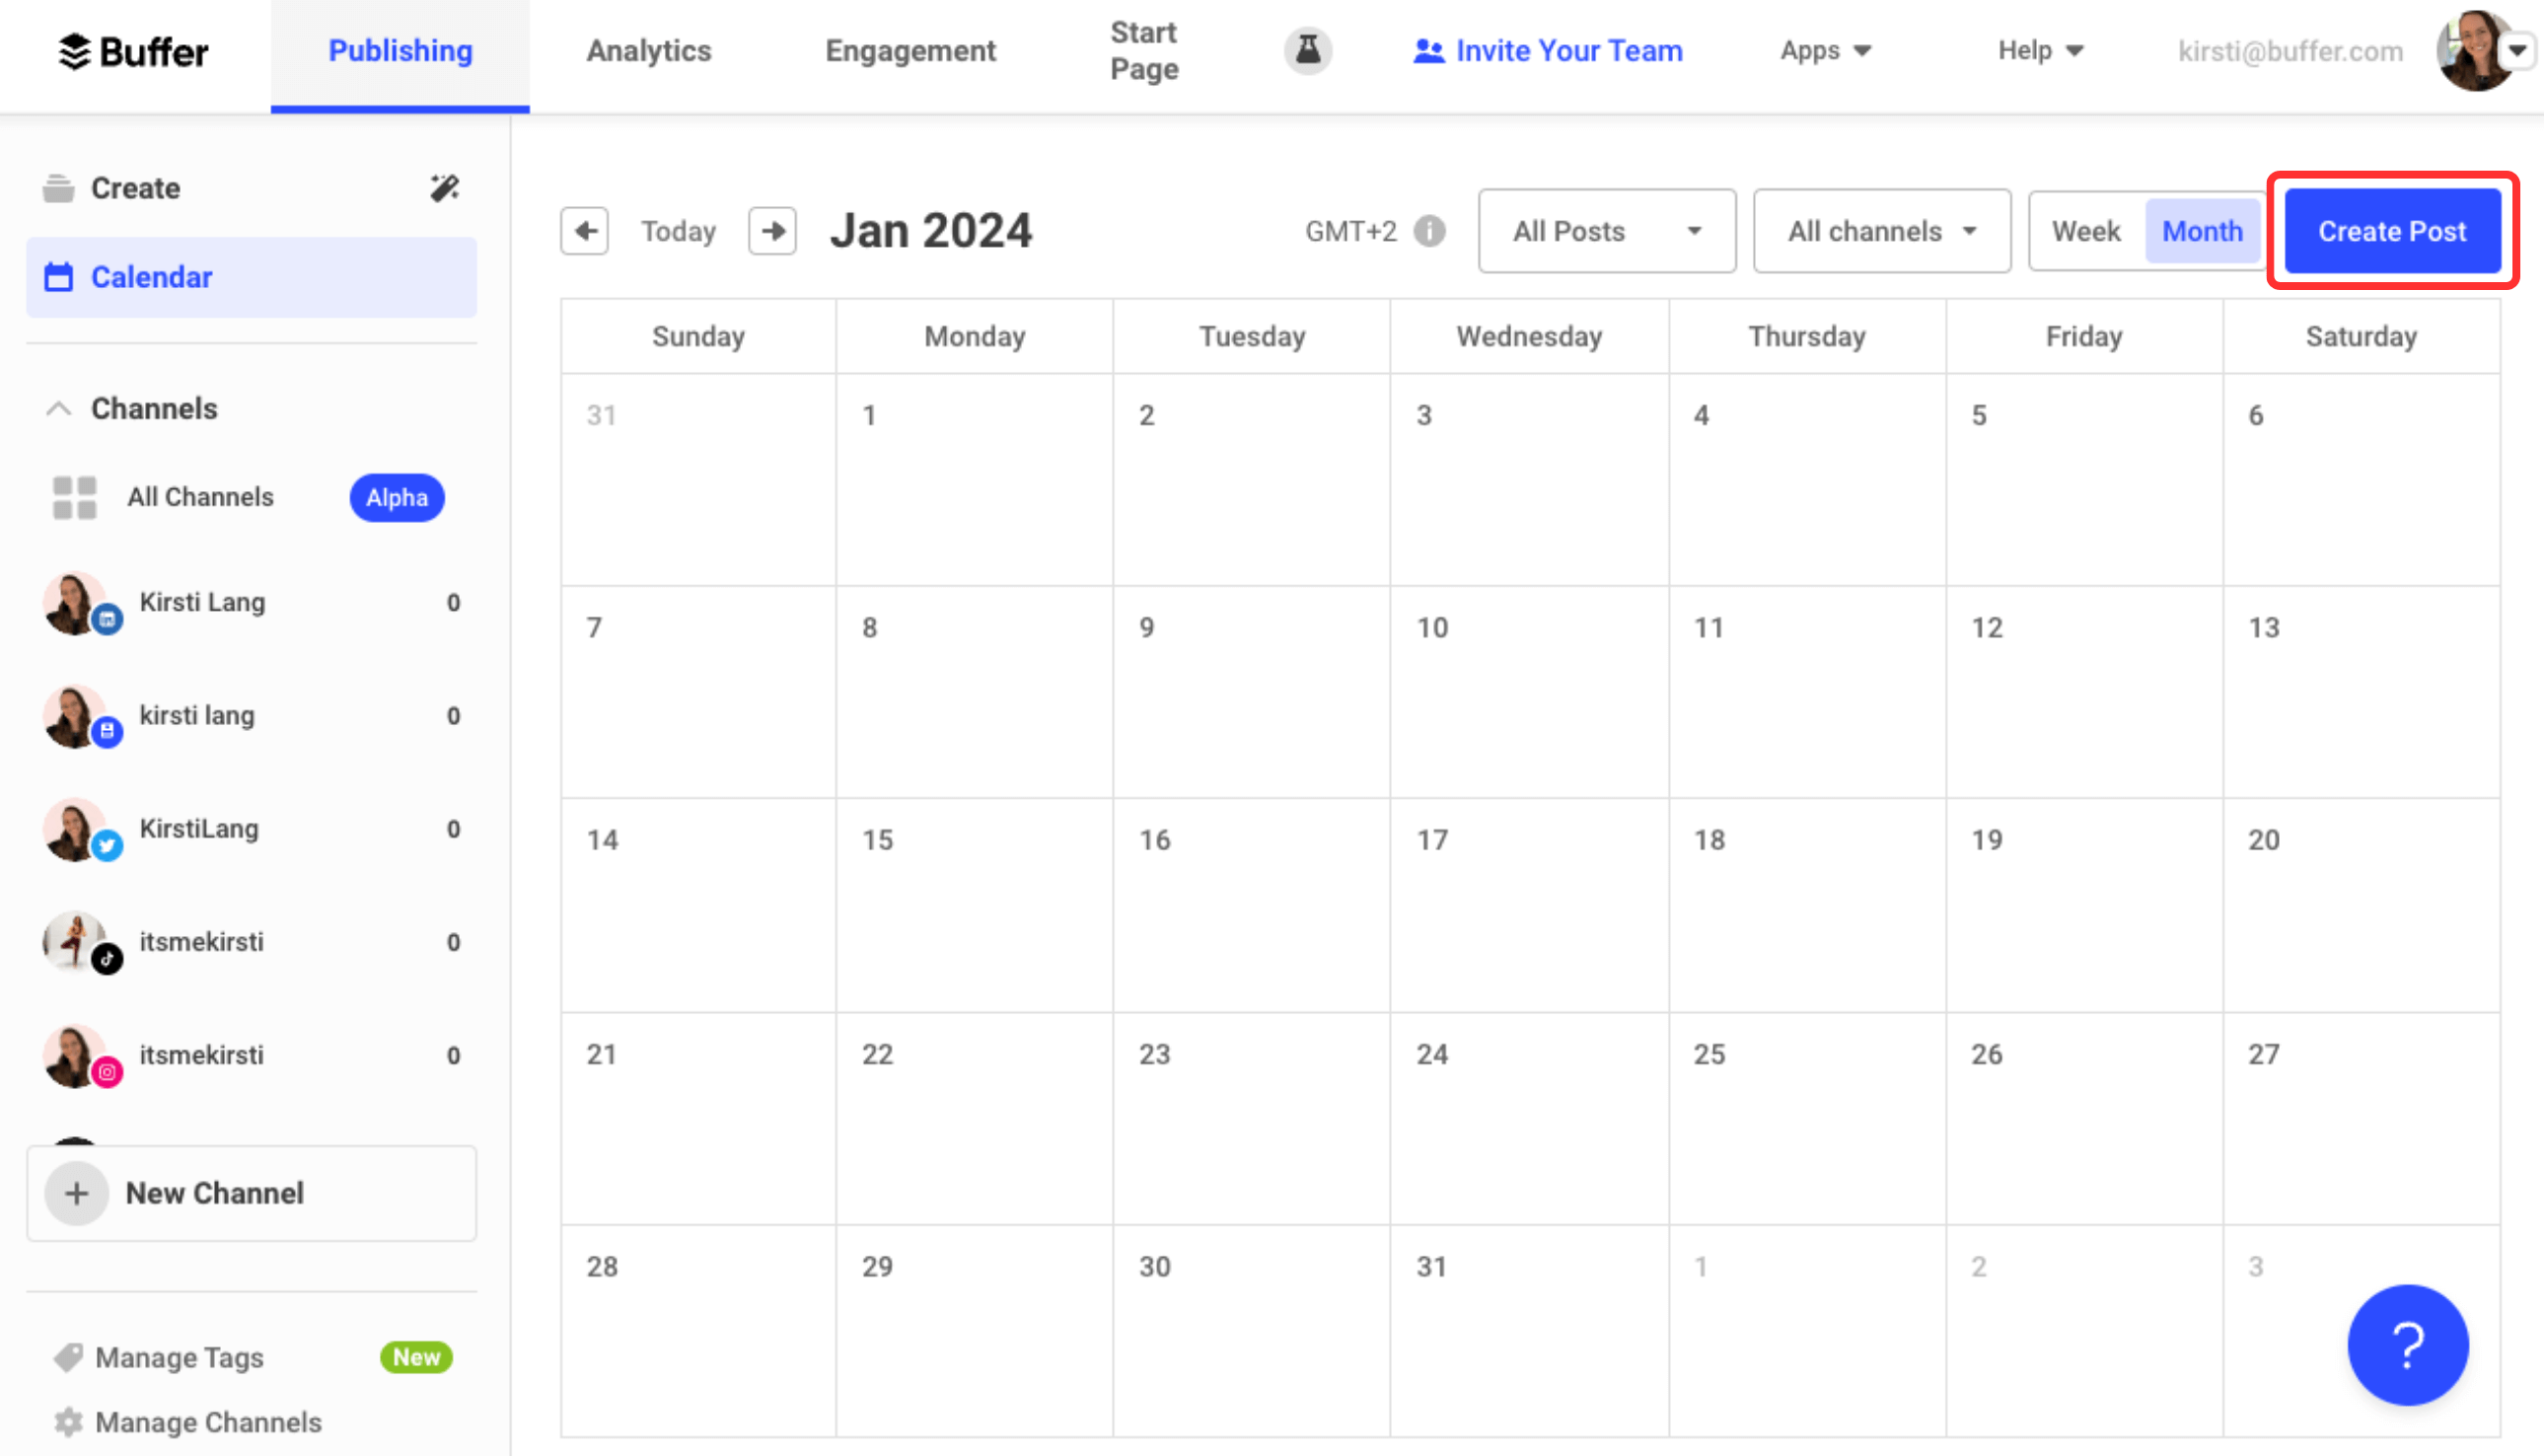
Click on Calendar in the top left corner, and you’ll be taken to a week view. (I like to use month view when I’m doing some serious content planning, which you can do by clicking Month on the top right corner. It all comes down to personal preference.)
To add to the calendar, click Create Post on the top right.
You’ll be taken to a similar pop-up window as mentioned in the Create Post section of Create where you can add text and media, get help from Buffer’s AI assistant, and more. When the post is ready to go, hit Add to Queue, Share Next, or Share Now, as above.
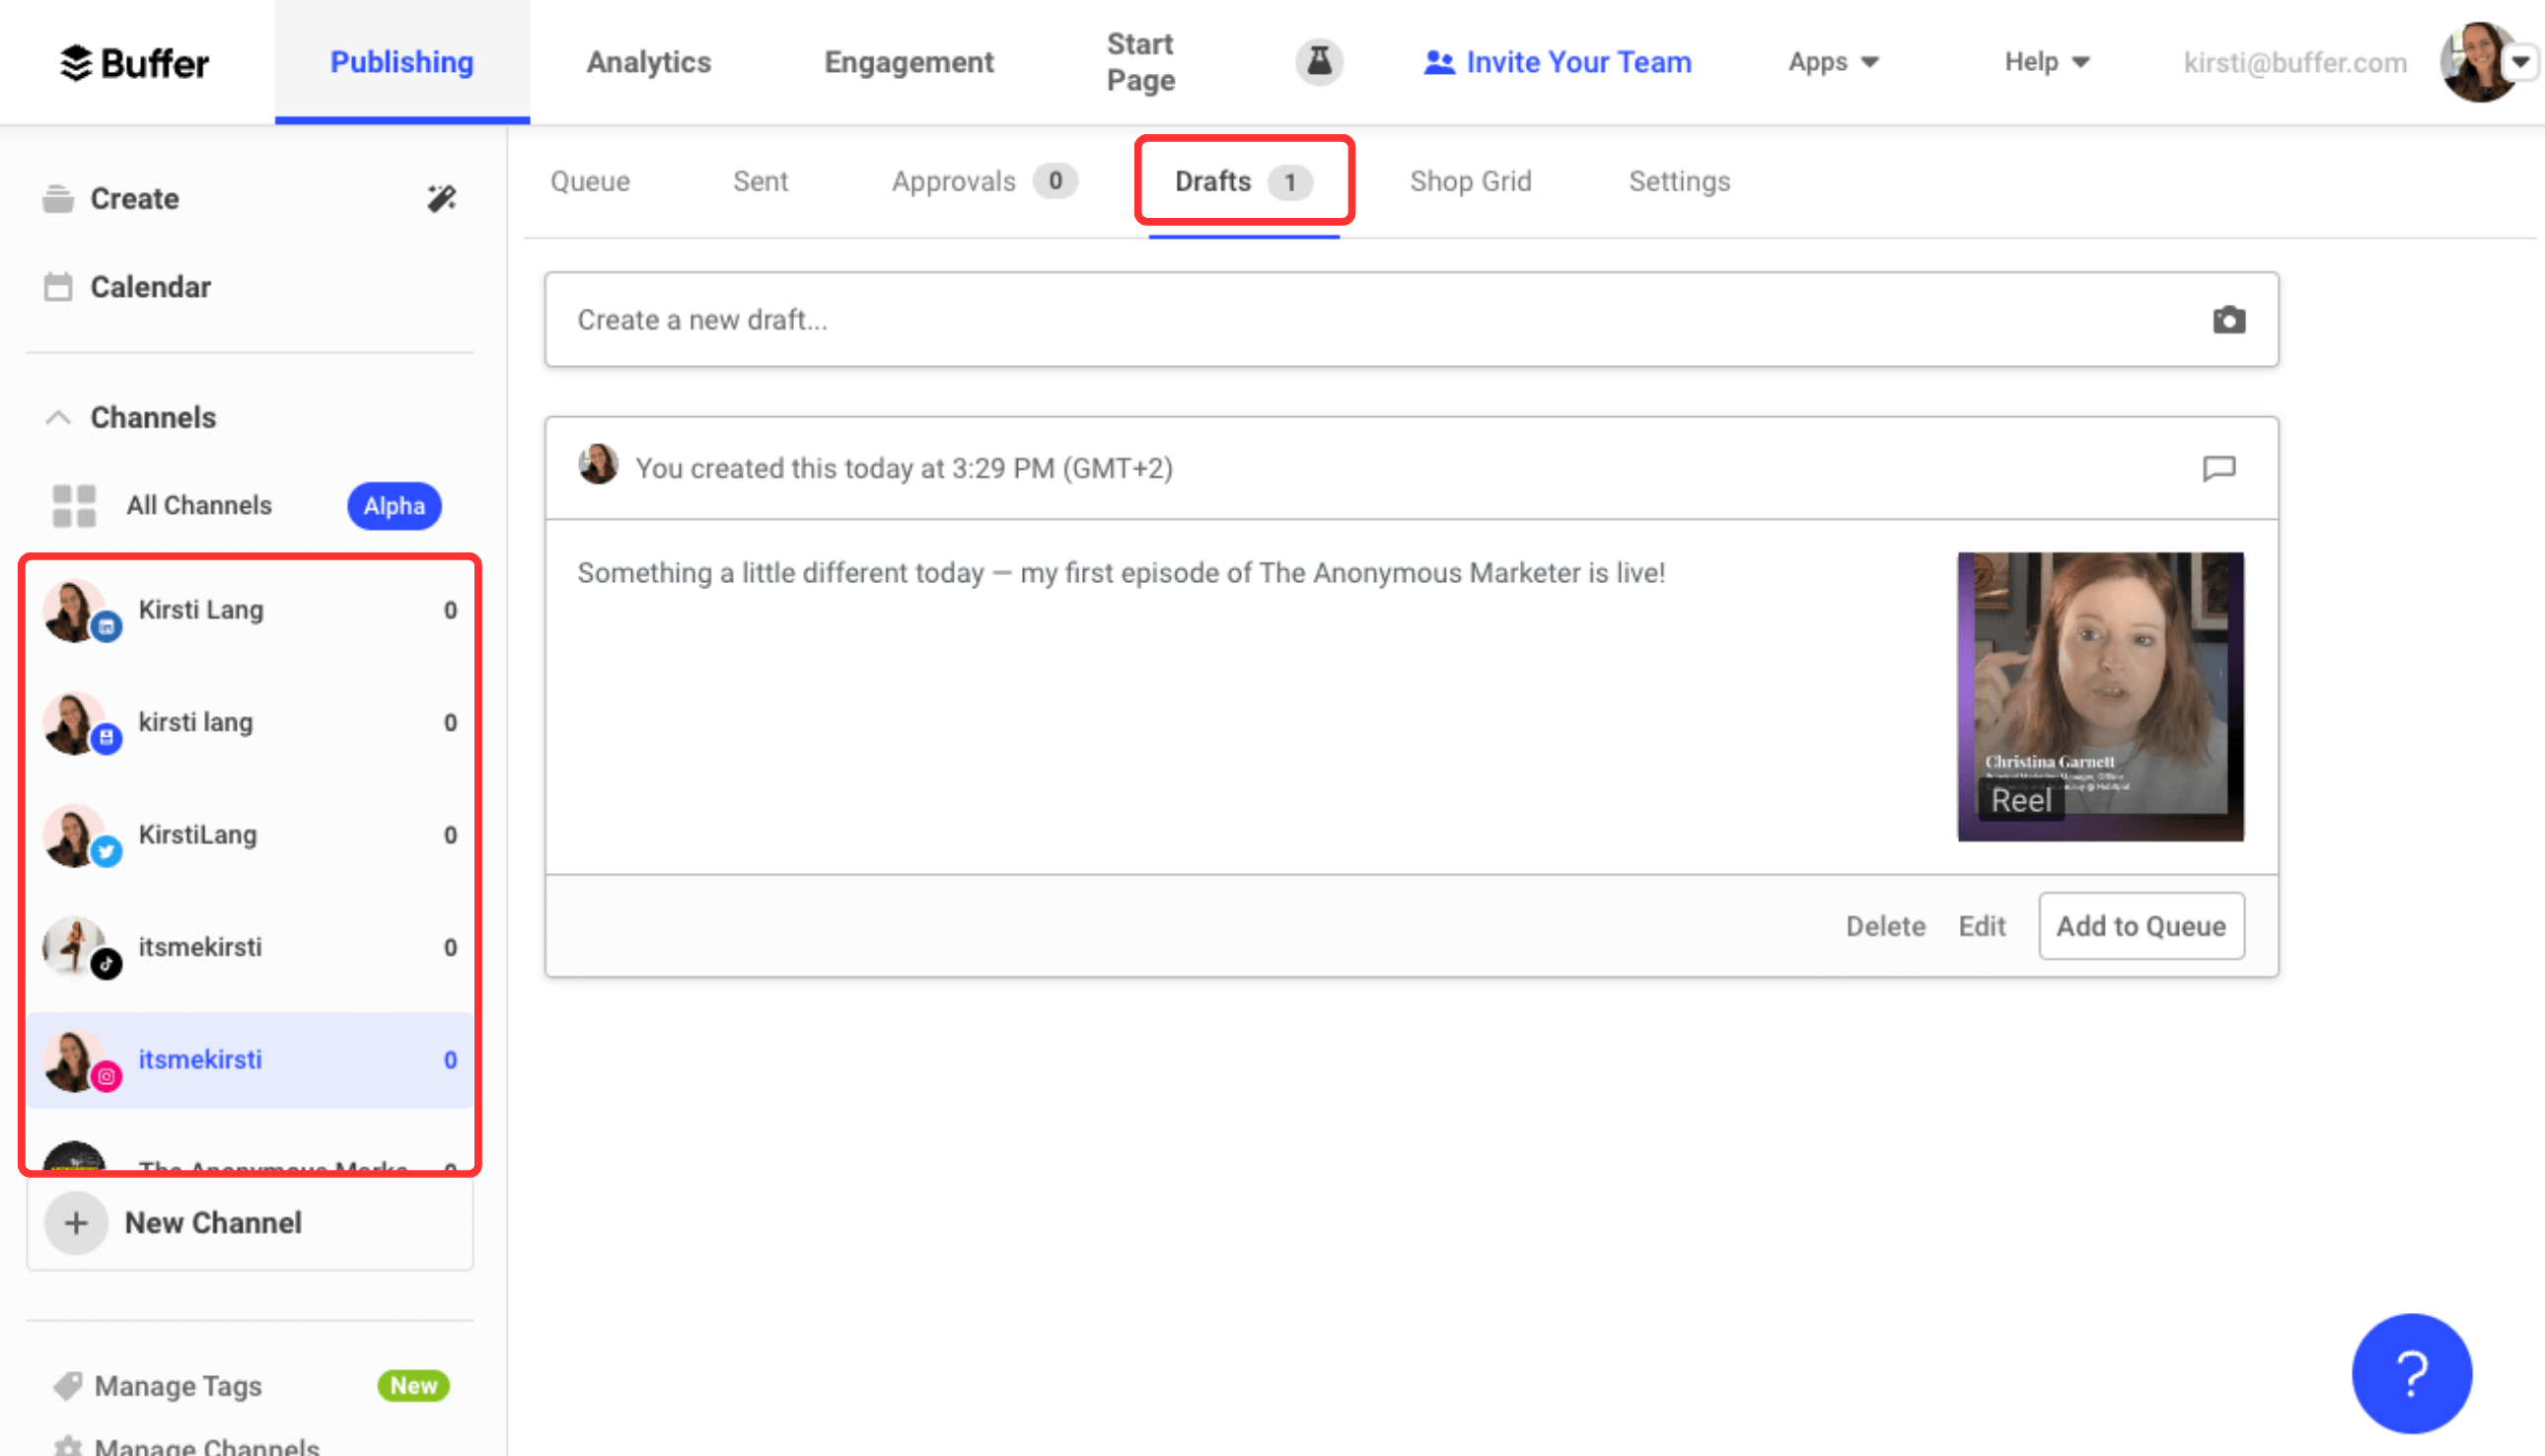
You also have the option to save the post as a draft if you’re not quite ready to schedule or if you need approvals from another team member or manager.
Finding your saved drafts is really easy — just click on the channel you saved the post for, then Drafts at the top of the screen.
6. Fine-tune your calendar
With your content ready and raring to go, play around with your calendar to find the perfect mix for each day, week, and month. As long as the post hasn’t been published, you can tweak everything to your heart’s content.
To see the details of each post in your calendar, hover over the card. Hit Delete to remove the post entirely, or Share Now to publish it immediately.
To make changes to the post, click Edit. Here, you can change everything from the publish date to the content itself.
In the monthly calendar view, you can also drag and drop cards on different days to have them go live at the same time on that new date. In the week view, you can do the same but drag it into a new time slot to change that, too.
Check in with your calendar at the beginning of each day to see what you have scheduled and refine your content if need be.
As much as it pays to be proactive with your calendar and schedule everything in advance, social media often needs reactive work, too. There might be a new trending TikTok sound you need to jump on right away. On the flip side, global events might mean you have to tweak your messaging, curate your content, or overhaul your plan completely.
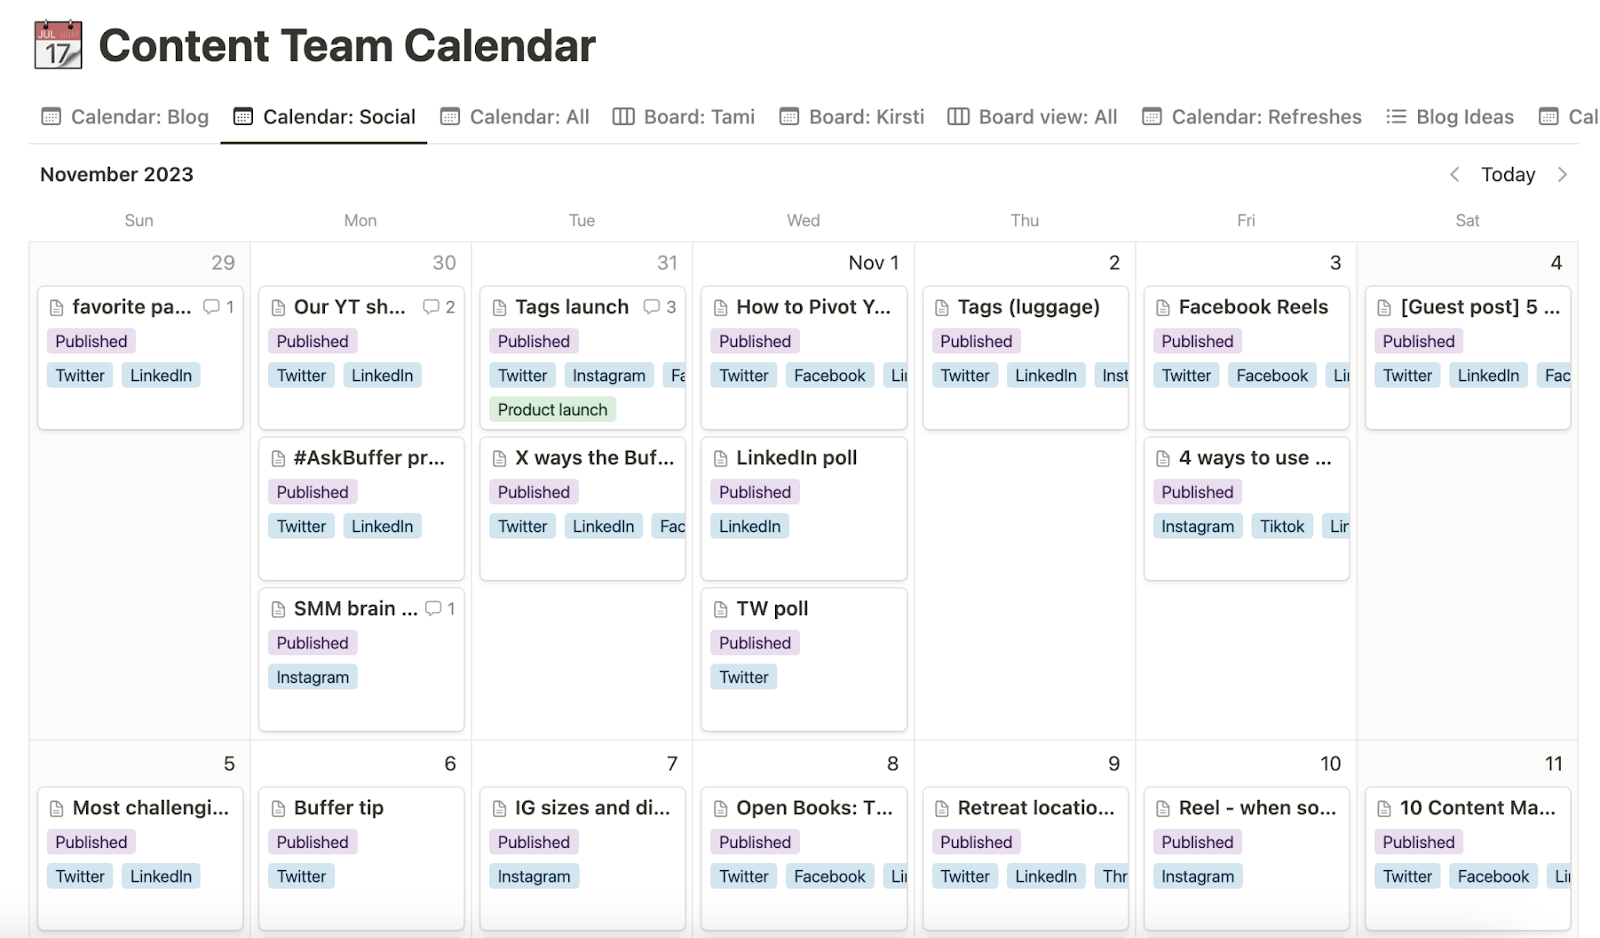
The social media calendar system we use at Buffer
At Buffer, we have X/Twitter, Instagram, LinkedIn, TikTok, Facebook, YouTube, Threads, and Mastodon accounts. We’re most active on X, Instagram, LinkedIn, TikTok, and YouTube. We’re a small team, so we’re prioritizing the social networks our target audience is most active on — but it’s still a lot to manage.
Enter: Our super-efficient content calendar system. We have a dual-tool system, as we log every piece of content we share — whether it’s a social media post, blog article, or new marketing release in the same content calendar in Notion. From there, our social media posts are moved into Buffer to be scheduled.
As a tools junkie, I’ve tried out a host of systems in my career, but when I started at Buffer in August 2023, I was blown away by the content workflow. While it might look complicated, it’s really easy to get to grips with and will give everyone at the company a bird’s-eye view of the content landscape at any given moment.
Here’s how that works:
- Our Social Media Manager, Mitra Mehvar, pulls resources from our blog content calendar and our marketing launch plan to share on social. She fills in the gaps with her own brilliant content ideas, often related to remote work, life at Buffer, or life as a Social Media Manager, small business owner, or content creator.
- She creates cards for each post in our content calendar in Notion, tagging them with the social channels she plans to post them to.
- She’ll draft all the required copy, and, if necessary, record a video. The copy and video link will go right in the relevant Notion card.
- Mitra will let our Head of Content and Communications, Hailley Griffis, know when the posts are ready for checking. Hailley usually gives her the thumbs up straight away.
- Mitra copies the content into Buffer to schedule the posts and move them around if need be.
- Finally, she checks back in often to monitor the content performance metrics right in Buffer’s analytics dashboard.
Social media calendar template
Technically, our social media calendar is a filtered view of our content calendar, where only posts tagged with a social media platform in the ‘channel’ field will be visible. This free template is molded after that view and is fully customizable.
Social media calendar template [button]
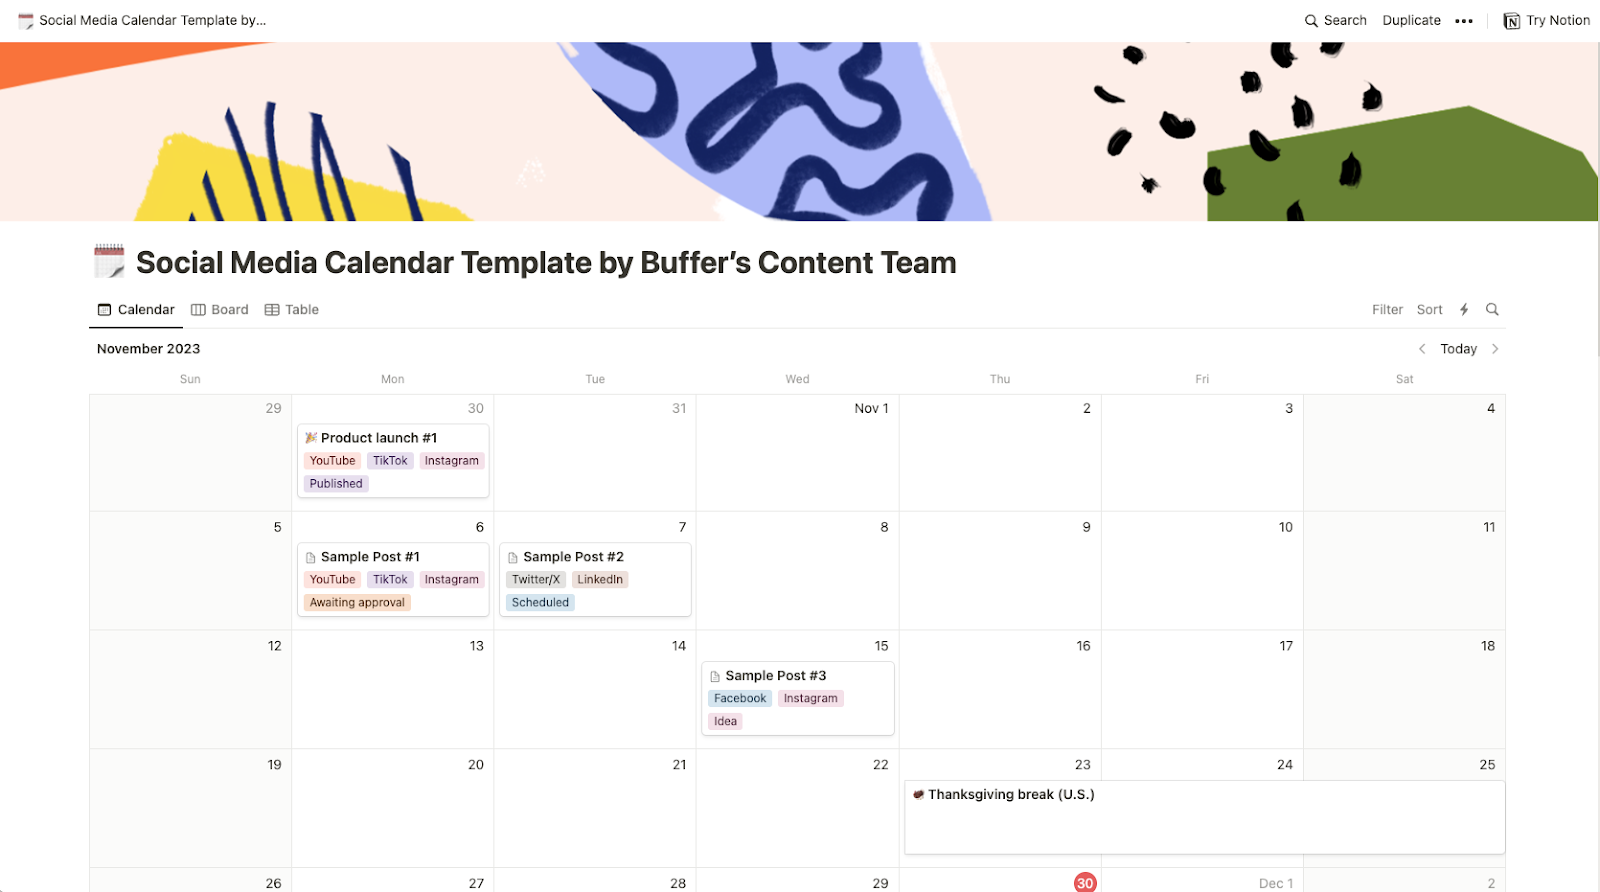
How to use this social media calendar template
- Click over to the template
- Click on Duplicate in the top right corner
- Create a free Notion account if you don’t have one already
- Get content creating! The social media content calendar template is yours to edit as you see fit.
Choosing the right tool for your social media calendar
When I first started out as a Social Media Manager, I hacked together a social media planning system and editorial calendar in a table in Microsoft Word (I don’t want to talk about it). Thankfully, times have changed a whole lot since then — there are a host of brilliant tools out there you can use for your social media calendar.
I may be biased, but Buffer is undoubtedly the best option if you’re looking for an all-in-one planning, scheduling, and analytics social media management tool. Notion is brilliant if you’re mapping out content outside social media platforms. Then there’s Asana, Trello, Google Sheets, Microsoft Excel, or even Google Calendar.
My point is: Figure out what feels right for you. While deciding on a system might feel like a make-or-break in your process, try not to overthink it too much. There’s no real way you can know whether it will work for you until you try it.
If you try one and it’s not working out, migrating to a new tool won’t be the end of the world. Don’t be afraid to experiment — as long as you have a social media calendar that works for you, you’re well on your way to success.
Try Buffer for free
140,000+ small businesses like yours use Buffer to build their brand on social media every month
Get started nowRelated Articles
TikTok's parent company must divest the app or face a ban in the U.S. Here's everything we know, plus how to plan ahead.

Whether you’re a full-time content creator, micro-influencer, nano-influencer, or just getting started, here’s how to create your own influencer media kit.

In this article, get answers to questions about social media for solopreneurs.