If a Reel falls in the algorithm forest, will anybody ever see it?
Reposting Reels on Instagram can help you make sure that every Reel gets seen.
Whether you want to repost your own, or add Reels from others to your content mix, both types can explode your growth.
Here’s how to repost a Reel on Instagram to your main feed, as a new Reel, and to Stories — plus how to schedule them all in advance.
Bonus: Download the free 10-Day Reels Challenge, a daily workbook of creative prompts that will help you get started with Instagram Reels, track your growth, and see results across your entire Instagram profile.
Can you repost a Reel on Instagram?
Yes… well, sort of. Reposting a Reel isn’t a built-in feature of Instagram so it’s not as simple as tapping a button. But there are several ways to do it — all covered below.
Reposting your own Reels: No extra tools required.
Reposting Reels from other Instagram accounts: You can do it for free, but you’ll need a few tools.
How to repost a Reel on Instagram: 3 ways
There are 3 main reasons to repost a Reel:
- Extend the reach of your existing content.
- Share Reels from your customers or influencer marketing partners.
- Curating and reposting Reels means you can post more often, which the Instagram Reels algorithm loves, without needing to invest more content creation time.
Before we start: Rule #1 of reposting Reels is to always tag and properly credit the original creator. I cover how to do that with each method below.
How to repost a Reel to your Instagram feed
Step 1: Download a repost app
Currently, you can’t repost a Reel on Instagram in-app. It’s not like tapping the share button on other platforms. To share someone else’s Reel to your profile, you’ll need to use another app.
There are several free options available, including Repost (iOS or Android), Repost for Instagram (iOS only), Reposta (iOS or Android), and many more. Check recent ratings and reviews to help you decide which app to choose.
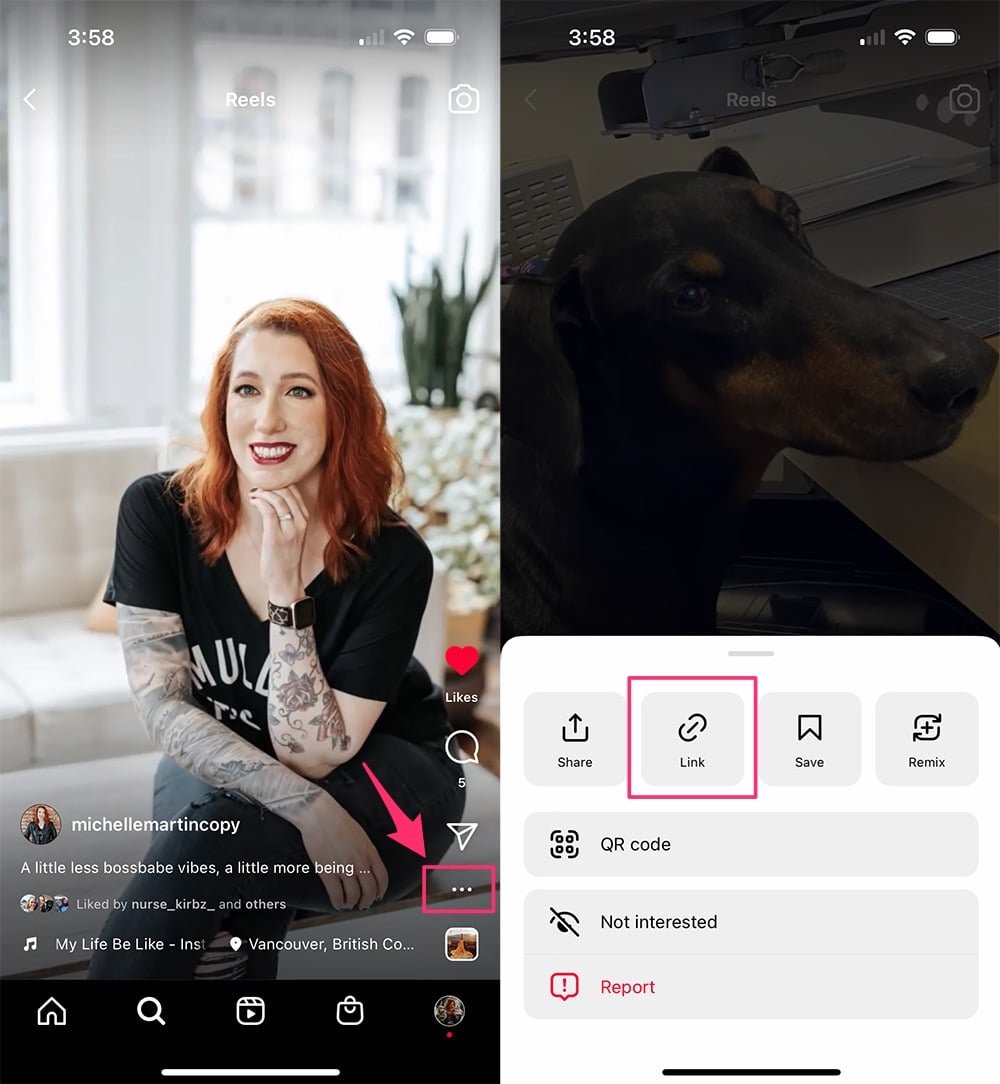
Step 2: Copy the link to the Reel
Find the Reel you want to repost and copy its link. If you’re browsing Instagram on the web, it’s as simple as copying the web address.
If you’re in the app, tap the 3 dots on the right side, then Link to copy it.
Step 3: Paste the Reel link
With the link saved in your clipboard, open up whichever reposting app you downloaded and paste it in. Many will automatically grab the link when you open the app, or you may have to manually paste it.
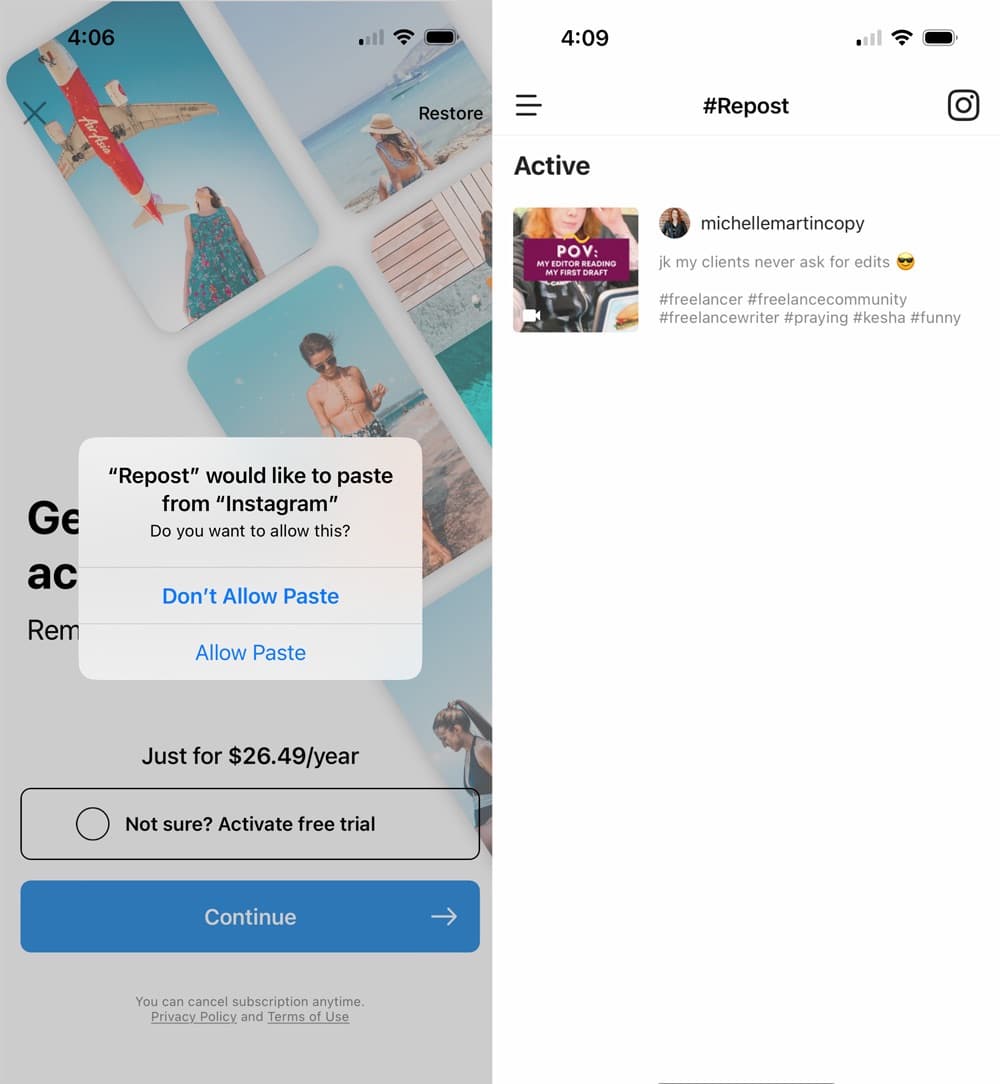
Source: Repost for Instagram
Step 4: Create a caption
Most reposting apps will bring in the original creator’s caption, which you can repost as is or replace with your own.
You also need to choose attribution settings. In Repost for Instagram, I can choose which corner the attribution will be in and either a black or white background.
Then tap Repost (or the equivalent button in your app), then Feed to share it to your as an Instagram post to your grid.
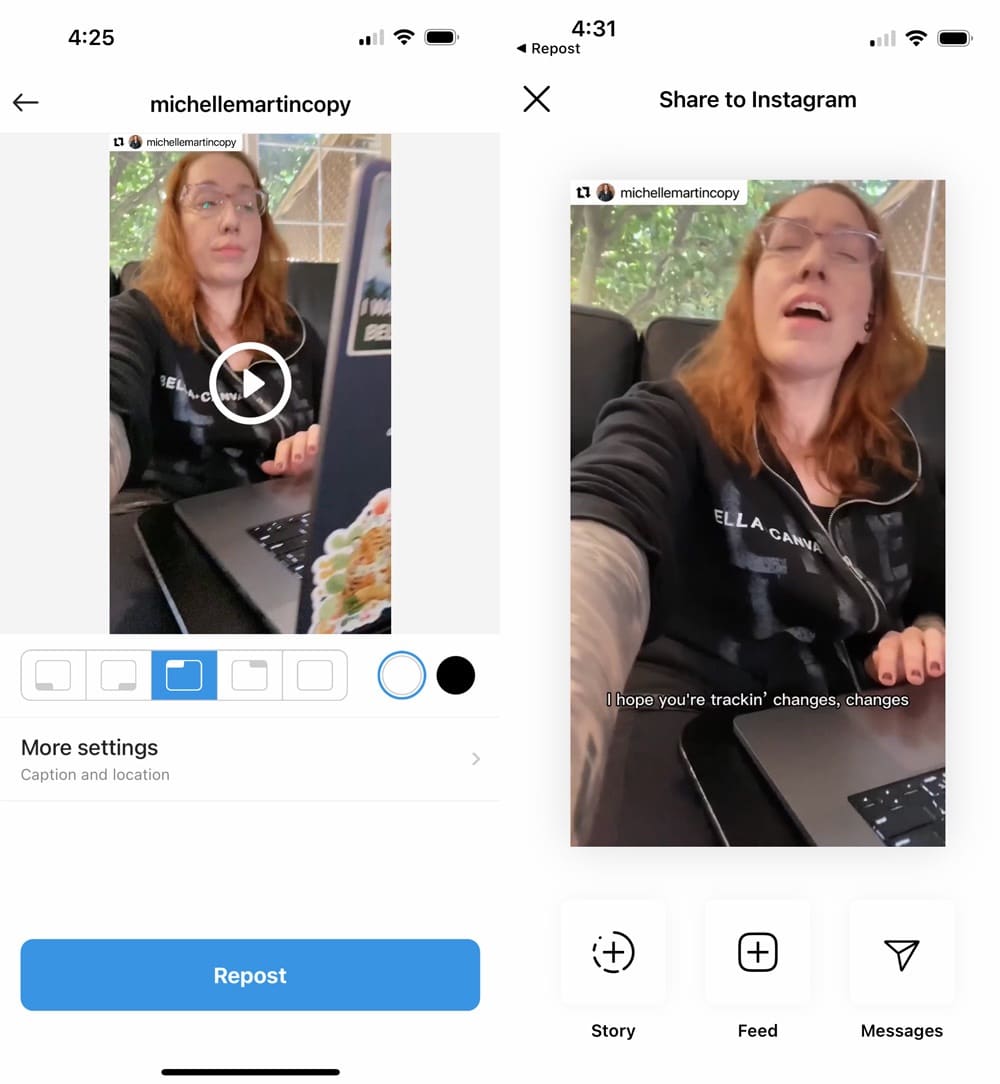
Source: Repost for Instagram
When reposting a Reel, ensure you:
- Keep the attribution label on.
- Tag the original creator in the text caption, ideally within the first line, especially if you’re also using their original caption.
- Also tag them in the Reel posting settings within Instagram.
How to repost an Instagram Reel as your own Reel
This is the same process as above, except when reposting it as your own, you don’t include the attribution or credit label. Some reposting apps let you remove this, so just tap that option and complete the simple steps above.
Of course, it goes without saying that you should only share your own Reels this way, because stealing other people’s work is wrong.
The exception to that is if you want to repost someone else’s Reel and schedule it, instead of posting right away. Remember to still credit them in your caption and tag them in the Reel!
This is the method to use if you want to easily repost your Reels to maximize the lifespan and reach of your content, or if you want to post the same Reel across several brand-owned accounts.
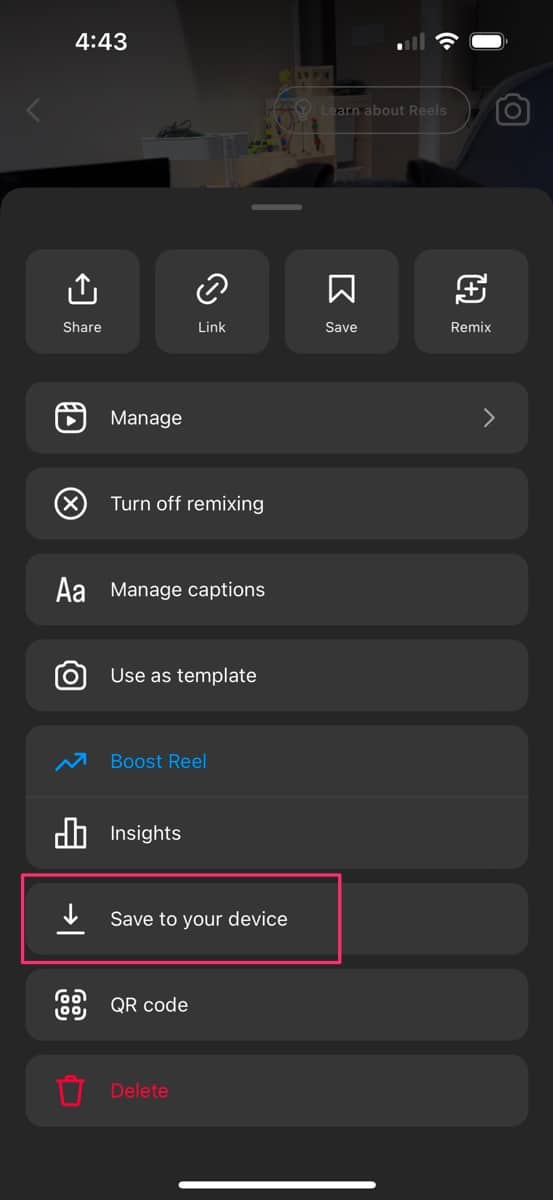
Step 1: Download your Reel
There are a few ways to download a Reel. In Instagram, go to your Reel, tap the 3 dots on the right, and tap Save to your device.
Step 2: Or, copy the link to the Reel
If you’re doing this with a Reel that isn’t yours (remember to credit the creator!), you won’t be able to download it directly from Instagram. Instead, copy the link to it. (See the previous section for a refresher.)
Step 3: Paste the link into an Instagram Reels downloader
Be careful: There are lots of shady sites out there trying to confuse you into accidentally downloading malware. And, since these sites aren’t officially sanctioned by Instagram, well… I have to say, “Don’t do this at all.”
But you’re here to repost a Reel so hypothetically, this is how you could download it from that copied link…
A few website options are RepostApp or InstaVideoSave, or apps like Instant Save (iOS or Android) or Reels Video Downloader (Android only).
Step 4: Post or schedule the saved Reel to Instagram
Post the Reel as you would any other by uploading the saved file from your phone to Instagram. Better yet, automatically schedule it for the best time to post with Hootsuite.
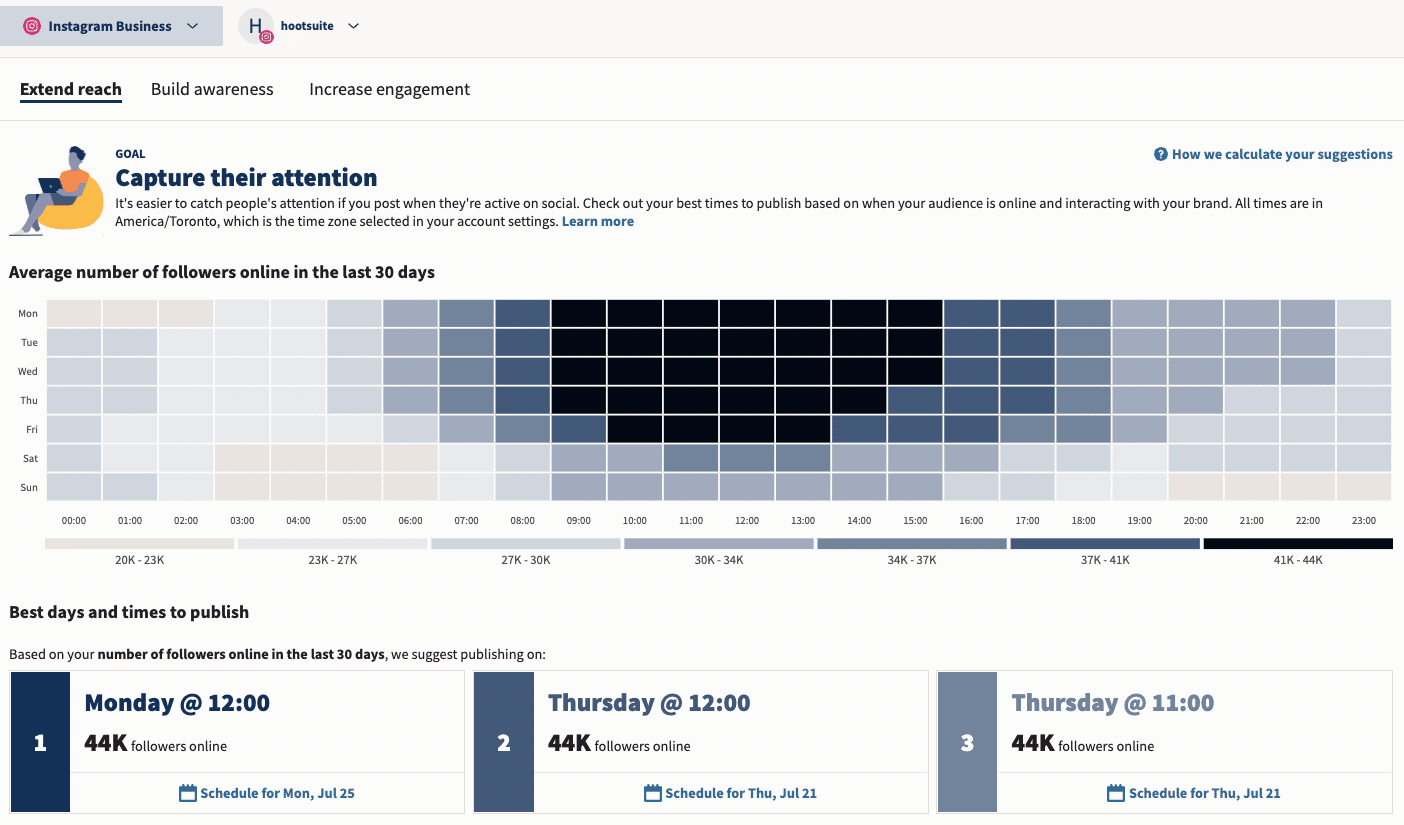
Hootsuite personalizes your recommended publishing times for each social profile based on the previous 30 days of analytics and engagement across your accounts. It’s not just a good time to post, it’s ✨your✨ best time to post.
Or, choose your own time to automatically publish the Reel to your account. It’s easy to schedule Instagram Reels alongside all your other social content with Hootsuite.
How to repost an Instagram Reel to Stories
You can share Reels from anyone to your Story right inside the Instagram app. (It just gets cut off after 15 seconds.) Watch our video, which will tell you how to repost a full 60-second Reel to your Instagram Story:
Step 1: Tap the share icon
Tap on the paper airplane icon. Tap Add Reel to your Story.

Step 2: Create and post your Story
Create your Story content. You could just share the Reel, but it’s a good idea to at least tag the original creator. Both as an extra way of crediting their work and because Instagram will send them an in-app notification that you shared their Reel.
In return, they could share your share. (So Meta-meta.) This can really boost your account if the original creator has a lot more followers than you.
Add any other text, emojis, stickers, polls, links, etc — like any other Instagram Story — and share it, or download it to schedule for later.

Bonus: Creative ways to repost an Instagram Reel
1. Remix a Reel
This takes more time than a simple repost since you have to create content for your part of the remix, but this can turn a share into a potentially viral Reel of its own. And, it’s a lot more original.
Of course, ensure the Reel you remix fits your content strategy and brand, and that your response is biz-appropriate. (Psst: This is what the cool TikTok kids call a “stitch.”)
Alternatively, you could repost a Reel using the remix feature without adding anything new, like this dog video. Essentially, “featuring” someone else’s Reel.
Personally, I have mixed feelings about this because 1) it’s not the true intention of the remix feature, and 2) it implies you’re adding something to the conversation when you’re not. So, if you don’t plan to add on your own content, I’d advise sticking to the reposting methods described above.
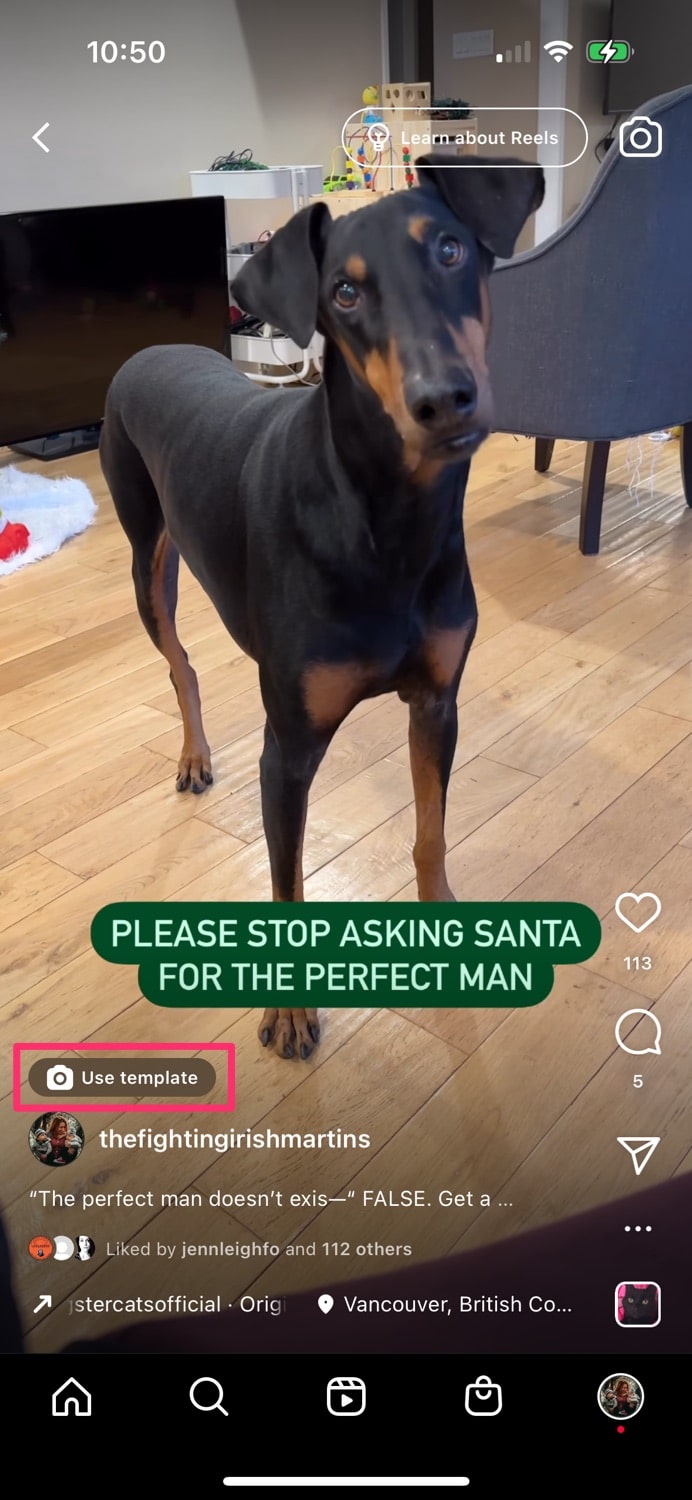
2. Use a template
Templates are a huge time saver if you want to reuse an audio clip for more Reels in the future. You can easily swap out the clips for new ones without having to manually sync them to the audio or worry about staying on beat.
Templates are perfect for making the most of popular sounds, or for always-popular trends like text-pointing Reels.
If you made a Reel from a template, you can easily make a new one by going to that Reel on your profile and tapping Use template.
3. Pin a Reel to your profile
This isn’t an actual repost, but pinning a Reel keeps it at the top of your grid.
Most people will likely see it in their feeds, but for those who visit your profile, this can greatly extend the reach of your best content.
Go to the Reel you want to pin, tap the 3 dots, then Manage, and choose Pin to your Reels.

Need more guidance on Reels? Check out the definitive guide to making rockin’ Instagram Reels for your business in 2023.
Post, repost, schedule, and auto-publish your Instagram Reels — along with all your other social media content — with Hootsuite. Plus, easily manage comments and DMs, and view detailed analytics. Try it free today.
Save time and stress less with easy Reels scheduling and performance monitoring from Hootsuite. Trust us, it’s reely easy.
Free 30-Day Trial