 Google Analytics is without a doubt one of the most useful tools available to help you gain insight into your online marketing performance. However, it’s quite complex and hence not the most user-friendly platform, especially not for beginners.
To get those juicy insights that can help you get better results from your marketing activities, you need to go through a set of Google Analytics admin settings and customize the reporting so you have a well-tuned stream of data and performance metrics coming in.
In this article I am going to walk you through the most important GA admin settings, I’ll explain what they are and how and when you should use them to get the most return on your marketing efforts.

So go ahead, log into your Google Analytics account and click the Admin tab at the bottom of the menu on the left. When you’re in there, you’ll see your admin settings menu divided into three columns Account, Property, and View.
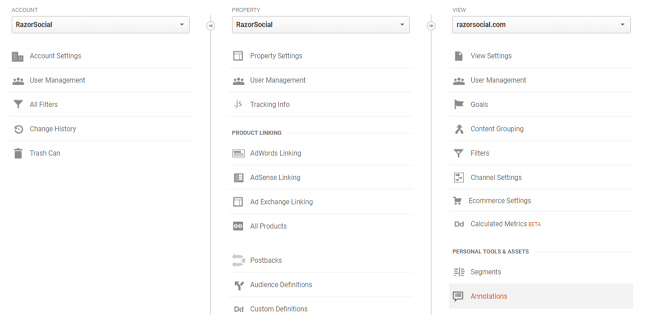
Account Level Settings
The account is the highest level of the organization in Google Analytics account structure and all your properties and views will be organized under your account.
Following are the available settings:
- Account Settings – These are the settings for your entire Google Analytics account. The Basic settings include your account ID and name. Next, you’ll see the Data Sharing Settings – this is where you choose what information you want to share with Google. You’re basically sending Google confidential data that they can use to improve their services. There are 4 options available: Google Products and Services, Benchmarking, Technical Support and Account Specialists.
User Management – This is a very important feature because it allows you to give different level permissions to the users of your GA account. If you want your team members to have access to certain areas of analytics, you’ll send them an email invite from here. There are four types of permissions available:
Manage Users. This level of access allows your team member to add new users, remove existing users, as well as set permissions.
Edit. With this type of permission, a team member will be able to edit and change any and all settings in your GA account.
Collaborate. This is a bit more restricted access compared to the first two. It allows your team member to create, share, and collaborate on personal assets.
Read and Analyze. A user can access or view all reports in your GA account, meaning they can analyze the data, but can’t edit or change any of the settings. They can also create and share their personal assets.

- Filters. Here you can set up filters on the account level. For example, you can exclude IP addresses of your team members from GA so they don’t count as visits in your reporting data. You can also exclude traffic from certain providers (e.g. ISP domains), as well as URLs that you don’t want to influence your analytics. We’d recommend that you exclude your IP address from any GA traffic. To find out your IP address use whatismyipaddress.com
- Change history. This is the history of all changes made to your account e.g. who was given permission and when, goals that were set, etc.
- Trash Can. Every time something (a property) is deleted from the account it goes directly to the can and stays there for 35 days until it’s permanently deleted. This is useful if you accidentally delete something because you can go to the can and retrieve the property.
Property Level Settings
Each account can hold up to 50 properties. A property can be your website, blog, subdomain, or mobile app. Each of your properties will have a unique ID and a tracking code that Google Analytics uses to collect and send data to the right property.
- Property settings. Here you can see your tracking IDs, the URLs, and the names of the properties you connected to your GA account.
- User management. This option lets you set user permissions or management rights for specific properties under your account.
- Tracking Info. Here you can see your tracking code or a code that’s added to your site so Google Analytics can track and gather data from it. Data collection for advertising features is where you can turn on data collection for remarketing purposes and create custom reporting for AdWords. Here’s an example of a tracking code > UA-000000-3 <. The first set of numbers (zeros in this example) refers to your account number, and the second set of numbers (-3) is the property number associated with your account. The tracking code should be copied to the footer of every page on your website. If you are on WordPress, use this plugin to add it.
- Referral Exclusion List. This option lets you exclude traffic coming from certain domains e.g. your own domain. This way GA won’t add your domain as a source of referral traffic.
- Search Term Exclusion List. Here you can add search terms or keywords that you want GA to recognize as direct rather than search traffic. For instance, this would be your domain name and company name. I would add here keywords such as razorsocial or razorsocial.com.
- Product Linking. Here you can link your GA account with AdWords, AdSense, AdExchange, etc. so you can track the performance of your ads (clicks, impressions, etc.) in Google Analytics. If you’re not advertising using any of these products, then you can skip this section of settings in total.
- Postback – This feature is related to mobile apps. Imagine you had a mobile app and you wanted to track app installs. You’d set up postback and Google would periodically reach out to check if there were any app installs. When you get this information, you link it to a supported ad network. So if you’re running ads on the network you can automatically track the results and then adjust the ads based on this info. Here are the ad networks currently supported and an example of setting up a conversion type to track:

View Level Settings
View settings help you customize the data for a specific property in different views so you can analyze the data segments more easily. You can have up to 25 different views per property and you can organize your data in views like all website data, goal tracking, in-app data (if you have both the website and web app under the same domain), etc.
- User Management – Set user permissions for a chosen view. If for some reason you want to give access to a team member to only one view and nothing else within your GA account, you can set it up here.
- Goals – This is one of the most important settings in GA. Goals give you a simple way of tracking and measuring different actions that you want users to complete on your site. Goals represent conversions, and as you may well know, these are very important indicators of the success of your marketing campaigns and your business. Examples of goals include making a purchase or submitting a contact information form. By properly setting goals in Google Analytics, you’ll get critical information, such as the number of conversions and the conversion rate for your site.

You can set up goals using GA Templates (start with a prefilled configuration) or create Custom Goals tracking that you have to setup yourself based on different events. For example, one of the most important goals for razorsocial.com is Thank You Page visits since that page shows only when someone leaves an email address. This way I immediately know how many new subscribers I have.
Here’s our detailed article on how to set up Google Analytics goals.
Content Grouping. This is a great feature typically used by e-commerce providers. Instead of analyzing individual pages it lets you group pages together for more efficient analysis. So, for example, if you had an e-commerce store you might have a collection of pages about men’s clothing and a collection of pages about female clothing, and you may want to report them separately.There are various ways of specifying a group, like using the contents of a URL. For example:
www.ecommercestore.com/mens/suits
www.ecommercestore.com/mens/jackets
www.ecommercestore.com/women/dresses
www.ecommercestore.com/women/skirts
For the above pages, you can create 2 groups. One for men and one for women. You can create the group because you can uniquely identify the men’s pages and the women’s pages based on the URLs.
- Filters. Like with Account and Property settings, filters are there to exclude certain IP addresses or domains from analytics for a selected view.
- Ecommerce Settings – If you run an e-commerce site and you want Google Analytics to report activity for it, you need to enable e-commerce tracking on the view level. Google will give you a customizable tracking code for your pages which will allow you to track the volume of sales, revenue, items sold, etc. Google explains how you can set this up HERE.
- Calculated Metrics – This feature is still in Beta and it’s meant to help you set up custom reporting.
- Segments – Segment visitors by age, location, gender, the operating system they use, etc. You can use segments to analyze subsets of data so you can examine and respond to any trends relating to those segments.
- Annotations – You can add annotations to spikes or drops in your traffic report charts so when you get back to analyzing them you know exactly what happened at that stage. To put in an ‘annotation’ just click a part of the graph and type in the information.
- Attribution model –Attribution is all about figuring out which touchpoints to assign credit to for user actions or conversions on your site. For example, let’s say that someone reads about your product on Facebook and then visits the product page but doesn’t buy. What happens if they revisit it the next day from a link on Google? Which touch point gets credit for this? Poor social media is probably going to miss out! That’s if you have set up ‘last interaction’ as your attribution model. In that case, the last interaction gets 100% credit.The attribution is set up by default but you may want to tweak some attribution settings if you’re an advanced user!Read all about it HERE.
- Alerts – Set an email or a mobile phone alert when something specific happens like a drastic change in traffic or user behavior. You can set daily, weekly, or monthly alerts. You’ll use this if you have a high traffic website and you want to track specific events that require your immediate attention. Imagine if you traffic today was only 5% of your yesterday’s traffic. With the alert set up, you’d immediately know if you had a huge traffic problem like this!
- Scheduled Emails – This is a very useful option if you want to efficiently analyze your GA reports. You can set it up so you get all your reports delivered to your inbox once a week, month, etc. You set it up once and your updated reports are sent to you automatically. These can be reports like Traffic Overview for your entire site, channel traffic report (referral, direct, social), Goals report, etc. You can have all these reports sent to you weekly as PDF files in one email. For example, I get all my reports for the previous week on Mondays compared to the week before so I can analyze the data and see where we’ve made improvements.
- Shortcuts – Here you can create shortcuts to take you directly to certain reports so you can find them quickly. This is a huge time saver!
- Share Assets – This is sharing of specific assets you created. Here you can share custom segments, goals, groupings or reports with anyone within your GA account by creating a template link. You can also share your assets publicly in GA solution gallery. Note that this way you don’t share your analytics data, but the way you’ve set up the asset – you’re basically sharing a template other people can use.
So there you have it – everything you need to get a better understanding of Google Analytics admin settings.
What are some of the most important GA settings you’re using to track, analyze, and optimize the performance of your marketing campaigns? Let us know in the comments section bellow!