

Want to learn how to add Vimeo subtitles and how to automatically create accurate translations? At VEED, a simple, yet powerful, video editor that automatically creates accurate subtitles and translations in a few clicks, we see many content creators use subtitles to build and engage with their audience.
In this guide, we’ll be taking a look at;
- How to upload subtitles to your Vimeo videos
- How to create accurate and automatic subtitles with VEED
- How to translate subtitles
We hope that you find this guide handy for your next editing session!
How To Upload Subtitles To Vimeo
To start off with, let’s take a look at how to add subtitles to your Vimeo project. Vimeo subtitles can be helpful, and it’s worth going through the simple process here.
1) Upload your video file to Vimeo
As a starting point, head to the Vimeo website and hit the New video button in the top right hand corner. You’ll be prompted to sign in, but if you don’t already have a Vimeo account, you can sign up easily with Google.

Once you’ve done this, you can pick from uploading a video or directly creating a video on the platform.
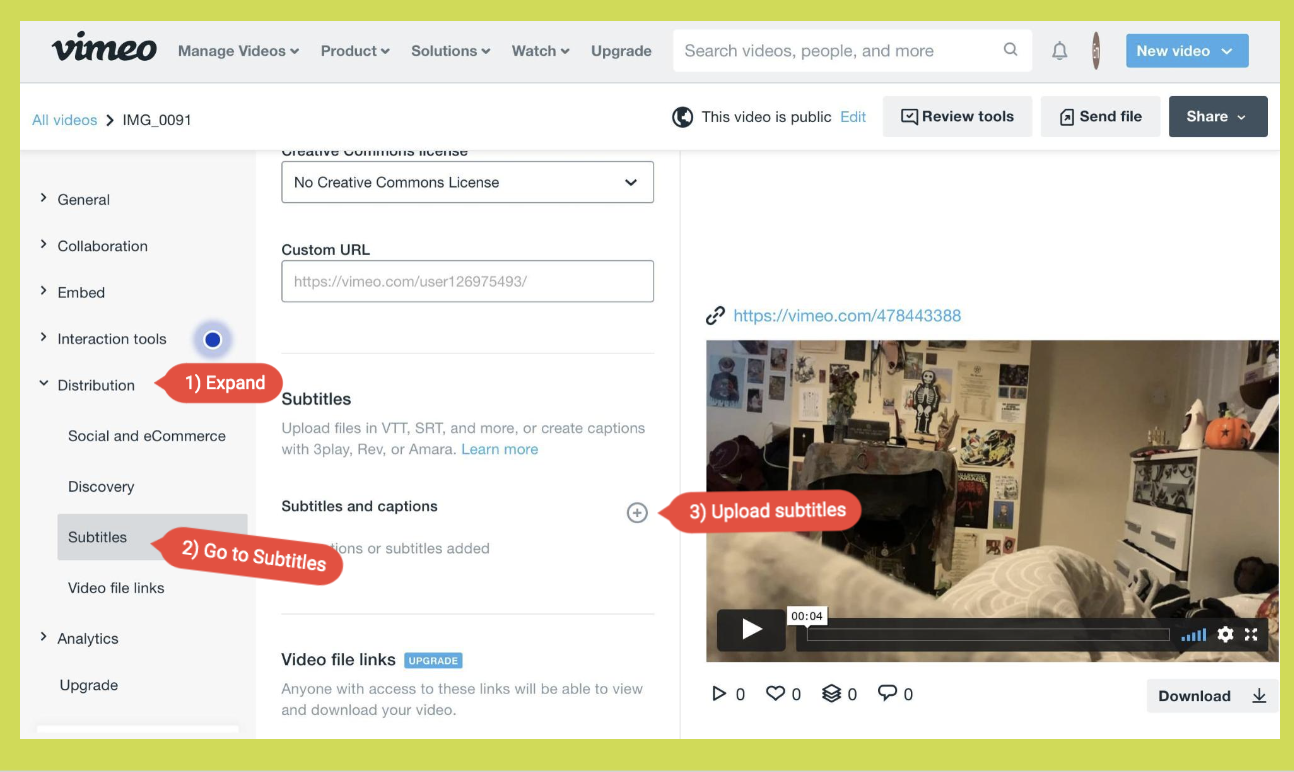
2) Go to the Distribution tab and hit Subtitles
Next, you’re going to need to go to the Distribution tab in the Edit Setting tab once you upload a video.
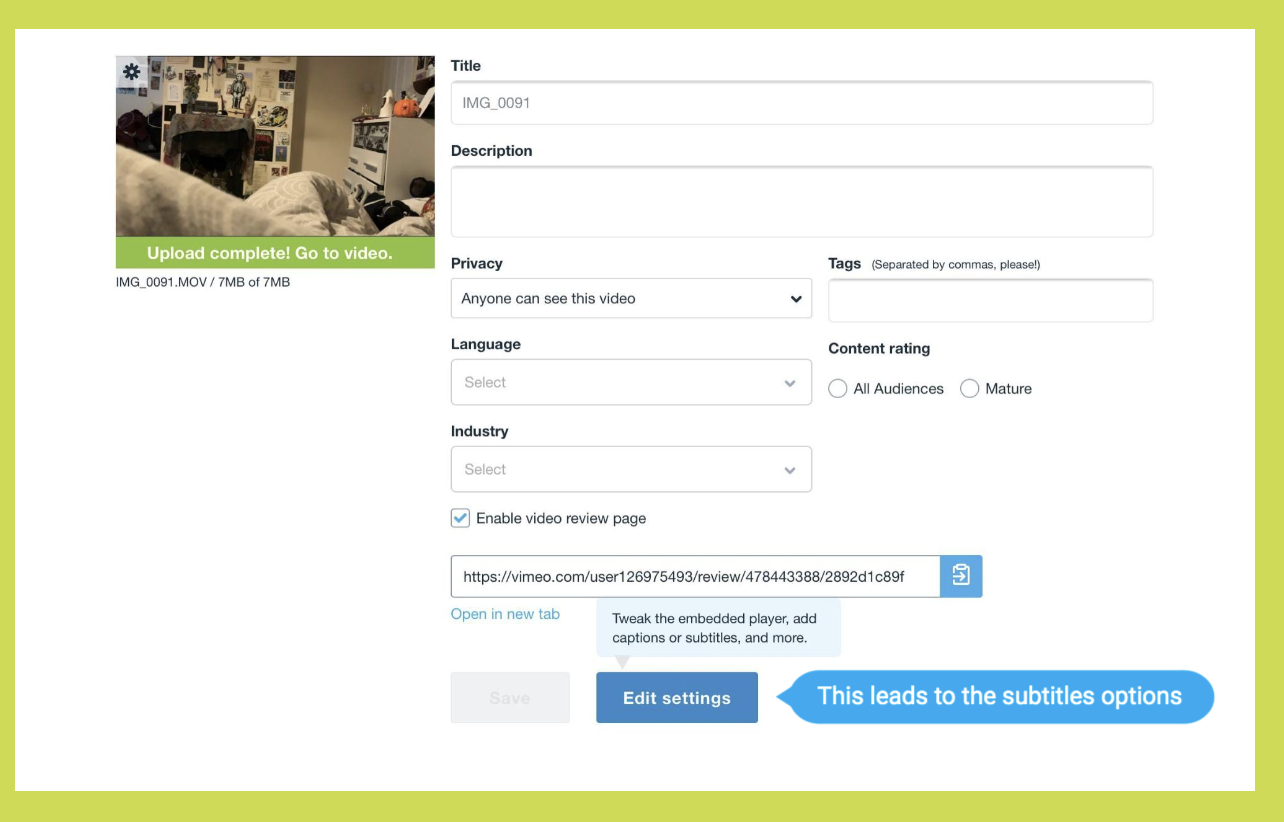
Once in the Distribution tab, select the Subtitles option.
Here, you’ll be able to sort out Vimeo subtitles and get to grips with how they’ll look on your video project once it’s finished.
3) Click the + button, specify the language and the file type
To add in the file for your Vimeo subtitles, hit the plus button. Here, you’ll be asked to specify the language that your subtitles are in and the file type.
It’s important to note that Vimeo supports multiple subtitle file formats, including;
- SRT files
- VTT files - recommended by Vimeo
- DFXP/TTML files
- SCC files
- SAMI files
It’s also good to point out that Vimeo recommends encoding subtitle files in UTF-8 format. Otherwise, files that contain special characters might not be displayed properly during video playback.

Once you’ve done this, you can choose your file from your documents or library.
4) Upload Your Subtitle File and Toggle It
When it comes to adding Vimeo subtitles, the most important step is toggling your file. If you do not do this, it will not display on your Vimeo videos, so make sure to do it.

If the button is blue, then you’re good to go.
5) Download your file or share to social media
After all these steps are done, you’re good to go! You can proceed with downloading your file, sharing it or publishing it to your social media feeds as originally planned.
How To Add Subtitles and Translations With VEED
Don’t have subtitles and/or want to translate your subtitles in different languages? VEED’s accurate auto-subtitle tool allows you to get subtitles or closed captions in a few clicks. Here's a simple process to do this.
We’ve gathered a quick, 5-step tutorial here.
1) Upload your video to VEED
To start off the subtitle creation process, upload your video to VEED.
Our platform accepts content uploads from a number of different locations, including:
- Local files
- Your device camera
- YouTube video links
- Dropbox
If you’ve signed up for VEED’s video editing services before, you can access your previous projects on the homepage.

2) Add auto subtitles

Head over to the Subtitle button in the left-hand toolbar, and choose your subtitle option. You can pick from automatic subtitles, manual subtitles and uploads from an external file.

Click Auto Subtitles in the subtitle settings menu if you want to create Vimeo subtitles.
External subtitle file type formats can include SRT, ASS, VTT and SSA files. We’ve got a number of conversion tools to hand if needed, like this VTT to SRT tool here.

3) Check the accuracy and translate if needed
Checking the accuracy of your subtitles is essential, no matter what platform it is that you’re using. Look for any small typos or grammatical errors, just to be safe. VEED’s auto subtitles feature is pretty powerful, but it most likely won’t be able to spell proper nouns, names, foreign words and uniquely-named brands.

4) Translate subtitles
If you’re hoping to translate your subtitles, you can do that right here as well

- Go to the Translate tab.
- Choose the language to translate to.
- Choose the language to translate from.
- Create your translations.
You can pick out the language that you’d like to put your subtitles into. It’s important to make sure that you’re still checking the accuracy here, to make sure that the subtitles work as well as possible.
5) Download
You can then go through your subtitle track files in different languages and download them.
Go to Options to download your subtitles or closed caption files under different formats. VTT is the closed caption file recommended by Vimeo. Other video players might prefer something like SRT, however.
Now, it’s time to download your brand new video project! Press the export button in the top right hand corner of your screen to start this process. For burned in captions, just make sure that the subtitles are playing when exporting the video.
It’s great to note that you can download VEED projects as MP4 files, or as GIFs. You can even share the download link, to make it easier for others to see your work.
Ready to Add Subtitles?
Overall, Vimeo is a wonderfully handy platform, and knowing how to use Vimeo subtitles effectively is a great way to help you stand out from the crowd and help your viewers consume your content without the sound activated.
If you haven’t started creating subtitles for videos, now would be the perfect time to do it. Accessibility is a hugely important theme for creators to be up to speed on. And with VEED's subtitle editor, this is a simple task only requiring a few clicks.
VEED can help you easily create accurate subtitles and translations, but it’s so much more than that. With our simple, yet powerful, video editor, you can add text to video, add external audio tracks, split and merge videos, and so on.
